Texo Docs
What each part of Texo does, and how to use it.
Installing
Texo ships as one disk image that runs on both Apple silicon and Intel Macs. Liquid glass needs macOS 26 or later.
The app isn't signed with a paid Apple developer certificate yet. macOS will ask once before opening it.
How to
- Download the
.dmgfrom the download page. - Open it and drag Texo into Applications.
- Open Texo. macOS says it can't verify the developer. Close the message.
- Go to System Settings → Privacy & Security, scroll down, and click Open Anyway.
- From then on it opens normally.
Building from source
Build Texo yourself if you want to read the code before running it, try changes that haven't been released, or modify it. A build you make on your own Mac opens without the security prompt.
What you need
- Apple's command line tools, for Git and the compiler:
xcode-select --install - Node.js 20 or later, with npm
How to
- Get the code:
git clone https://github.com/sjapanwala/texo, thencd texo. - Run
make dmg. It installs dependencies, builds the app and packages it for your Mac's chip. - Run
make opento open therelease/folder, then openTexo-0.1.0-arm64.dmg(or-x64on Intel) and drag Texo into Applications.
Options
| Command | Result |
|---|---|
make dmg | A disk image for this Mac's chip |
make dmg ARCH=universal | One image for Apple silicon and Intel |
make dmg ARCH=arm64 or ARCH=x64 | A specific chip |
npm install then npm run dev | Runs Texo straight from the source, with hot reload, without packaging |
make clean | Removes build output |
Builds are signed ad hoc by default. If you have an Apple Developer ID, make dmg SIGN=1 signs with it.
Your library
Your library is a folder: ~/Texo. Every note, database and drawing in it is a normal file. There is no database to export from and no proprietary format.
Other apps can open and edit the same files. When you switch back to Texo, it reads their changes.
How to
- Find anything: press ⌘K and type part of a title or a phrase from inside an item.
- Add a note: press ⌘N. It lands in the booklet you're looking at.
- Add something else: click the arrow beside Add Note to create a database, flow chart, drawing, notebook or shell note, import files, or start a recording.
- Bring in files: drag them onto the window, then choose a booklet.
Notes
Notes are Markdown files. What you see while writing is formatted. What gets saved is plain text you can read anywhere.
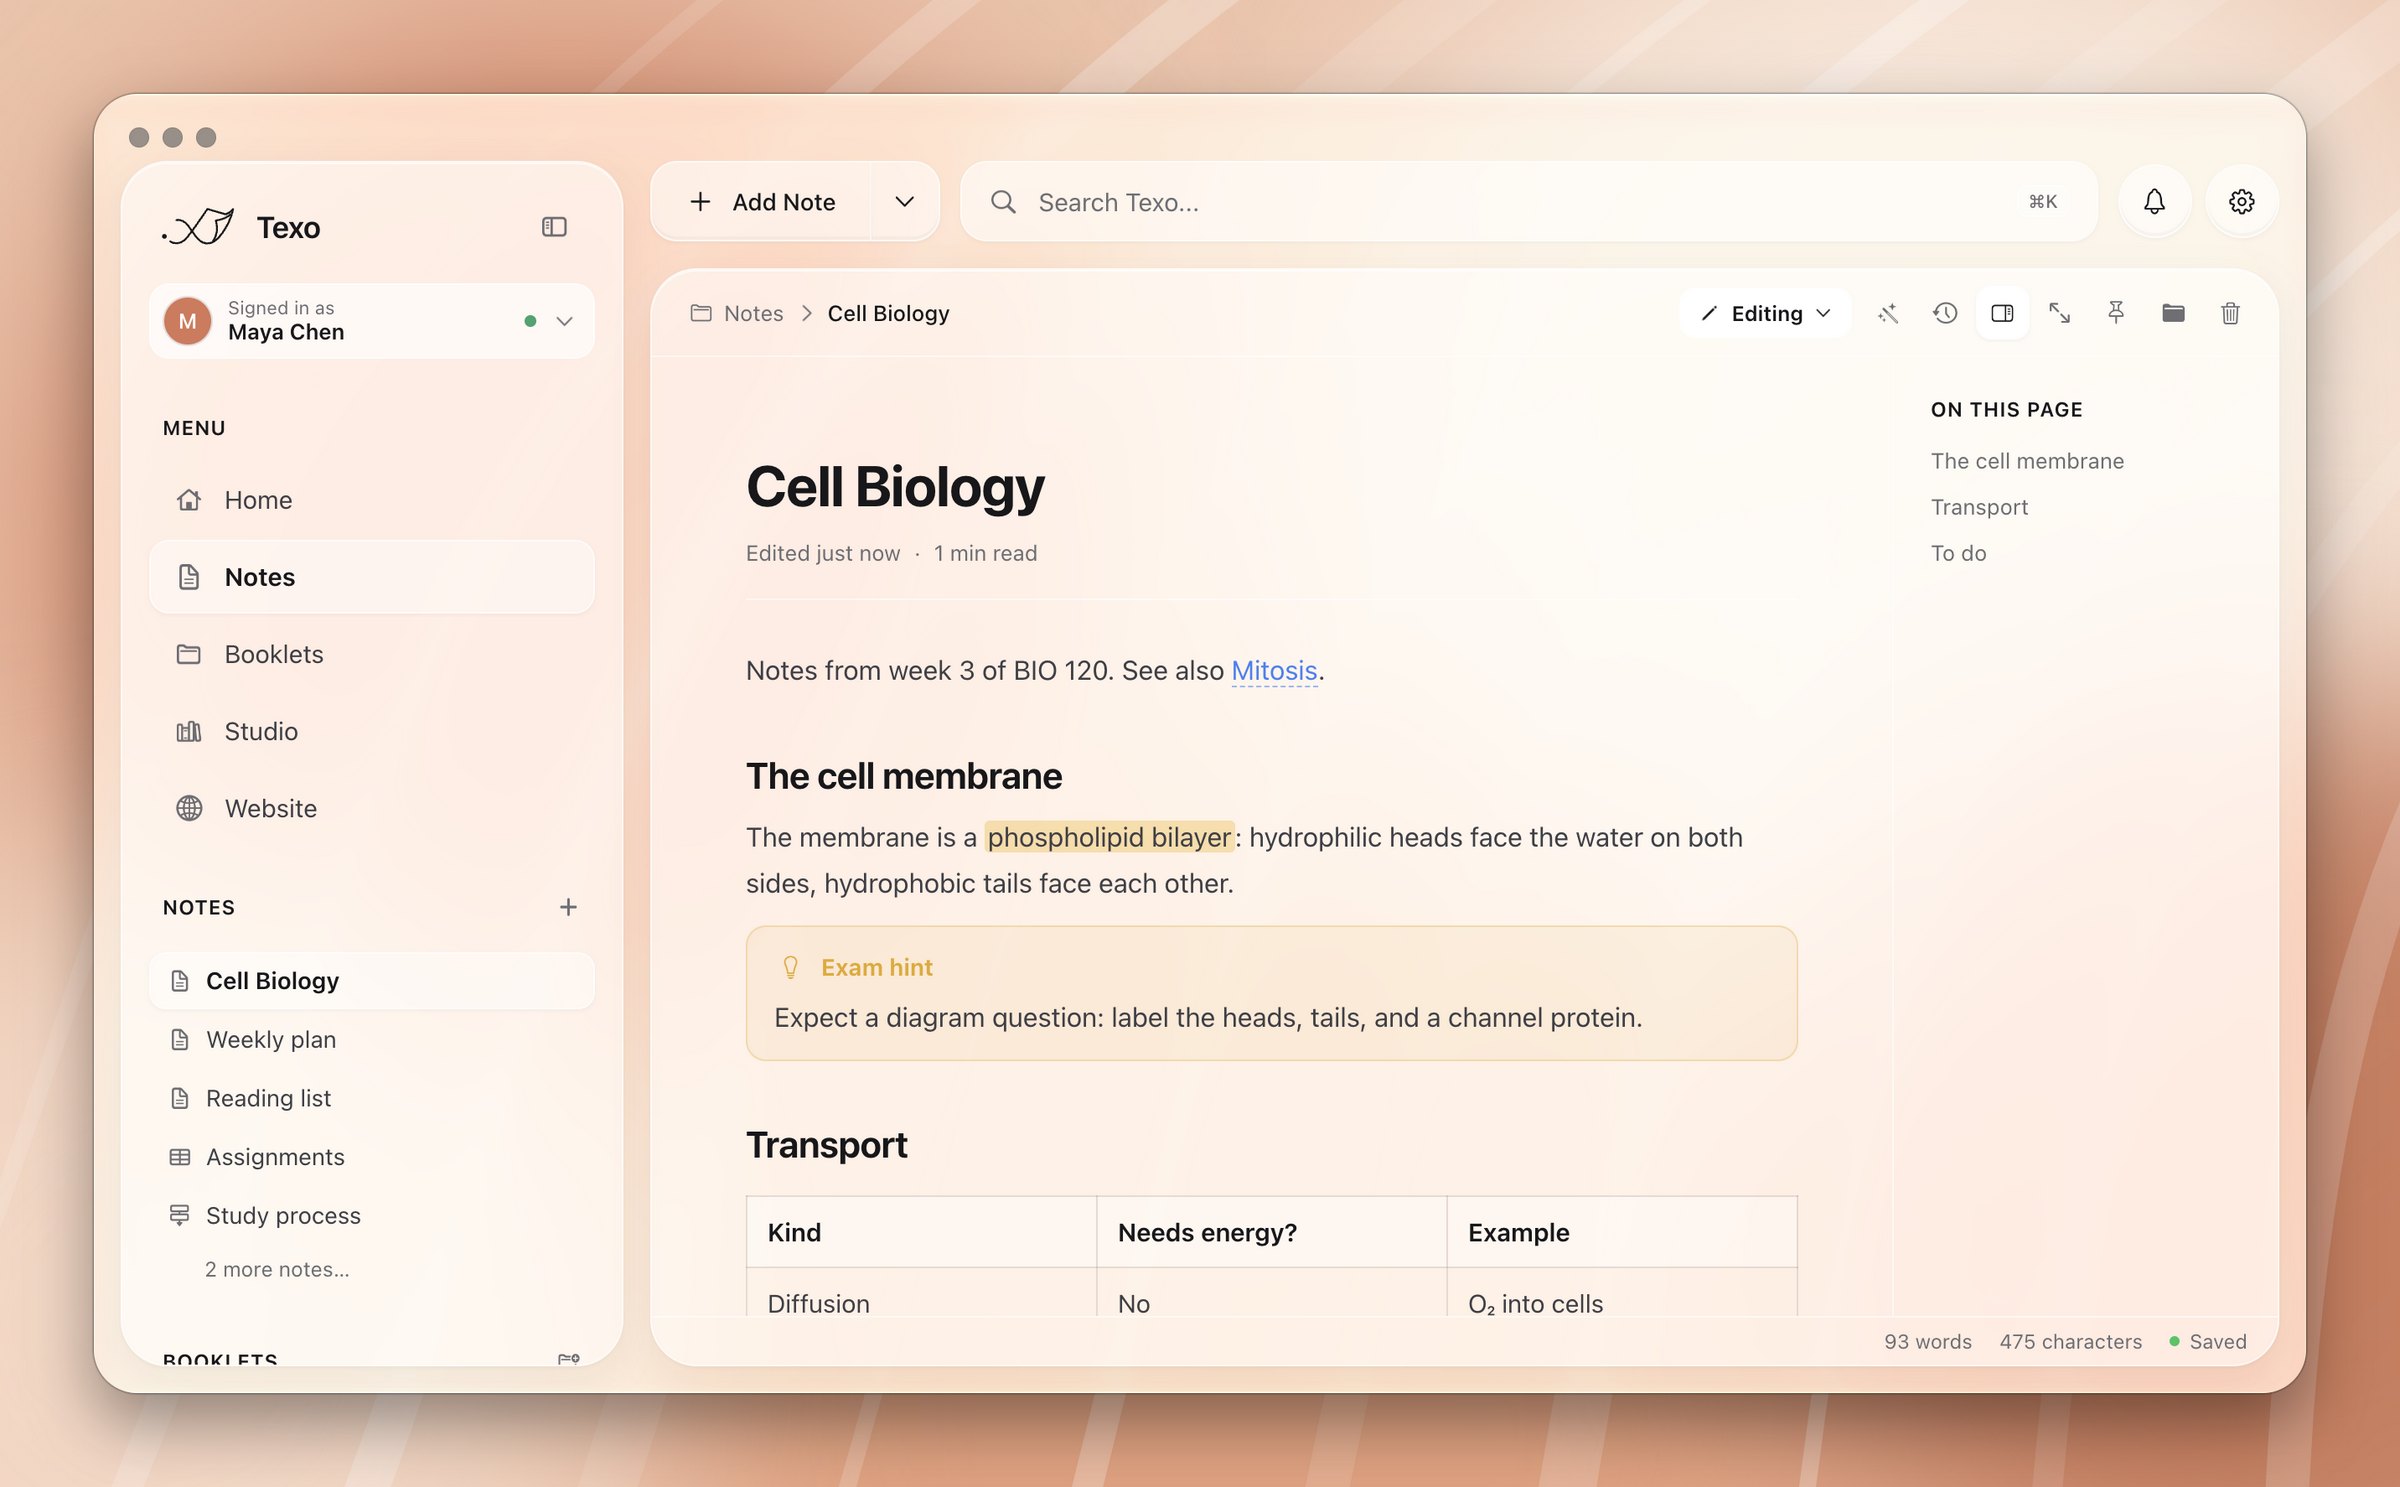
What a note can hold
- Headings, bold, italic,
==highlights==, links, quotes and dividers. - Code blocks with syntax colouring.
- Tables, images and checklists. Checklists can nest bullets or numbered steps underneath.
- Callouts: tip, note, info, warning, danger, success, question and quote.
- Math, inline with
$…$or on its own line with$$…$$.
Every unchecked to-do in every note also appears in Home's To-dos widget. Tick it there and it's ticked in the note.
How to
- Insert anything: type
/and pick a heading, list, callout, table, equation, code block, image, template or agent. - Add a callout by hand: start a line with
> [!tip] Title. - Edit an equation: click it.
- Add an image: paste it, drop it in, or use
/. It's saved toAttachments/and linked by a relative path. - Link two notes: add a normal Markdown link to the other note's file. Clicking it opens that note.
- Add emoji: type
:and a few letters. The best match appears in grey. Tab accepts it, ↑ ↓ cycle through others. - Fold a section: hover a heading and click the chevron, or press ⌘⌥[. ⌘⌥] unfolds. Folding changes the view only.
- Write without distractions: press ⇧⌘F for focus mode.
Templates
Four come built in: Meeting Notes, Project Brief, Daily Note and Lecture Notes. Any note you keep in a booklet named Templates becomes one too. {{date}}, {{time}}, {{weekday}} and {{title}} are filled in when you use it.
How to
- Click the arrow beside Add Note and choose From a template.
- Or, inside an open note, type
/and the template's name to insert it at the cursor.
The status bar under each note shows word and character counts, reading time and whether it's saved. The outline beside the page lists its headings and can be hidden.
Kinds of items
Each kind is saved in an open format, so it outlives the app.
| Kind | File | What it's for |
|---|---|---|
| Note | .md | Writing |
| Shell note | .shell.md | Notes beside a live terminal running your login shell |
| Notebook | .ipynb | Python cells run by a local kernel |
| Drawing | .excalidraw | Freehand sketches and diagrams |
| Flow chart | .canvas | Processes and decisions |
| Database | .csv | Anything you'd track in rows |
Notebooks need Python 3 with ipykernel installed: pip3 install ipykernel.
Databases
A database is a CSV file. Column types and views live in a small hidden file beside it, so the CSV stays clean for any spreadsheet app.
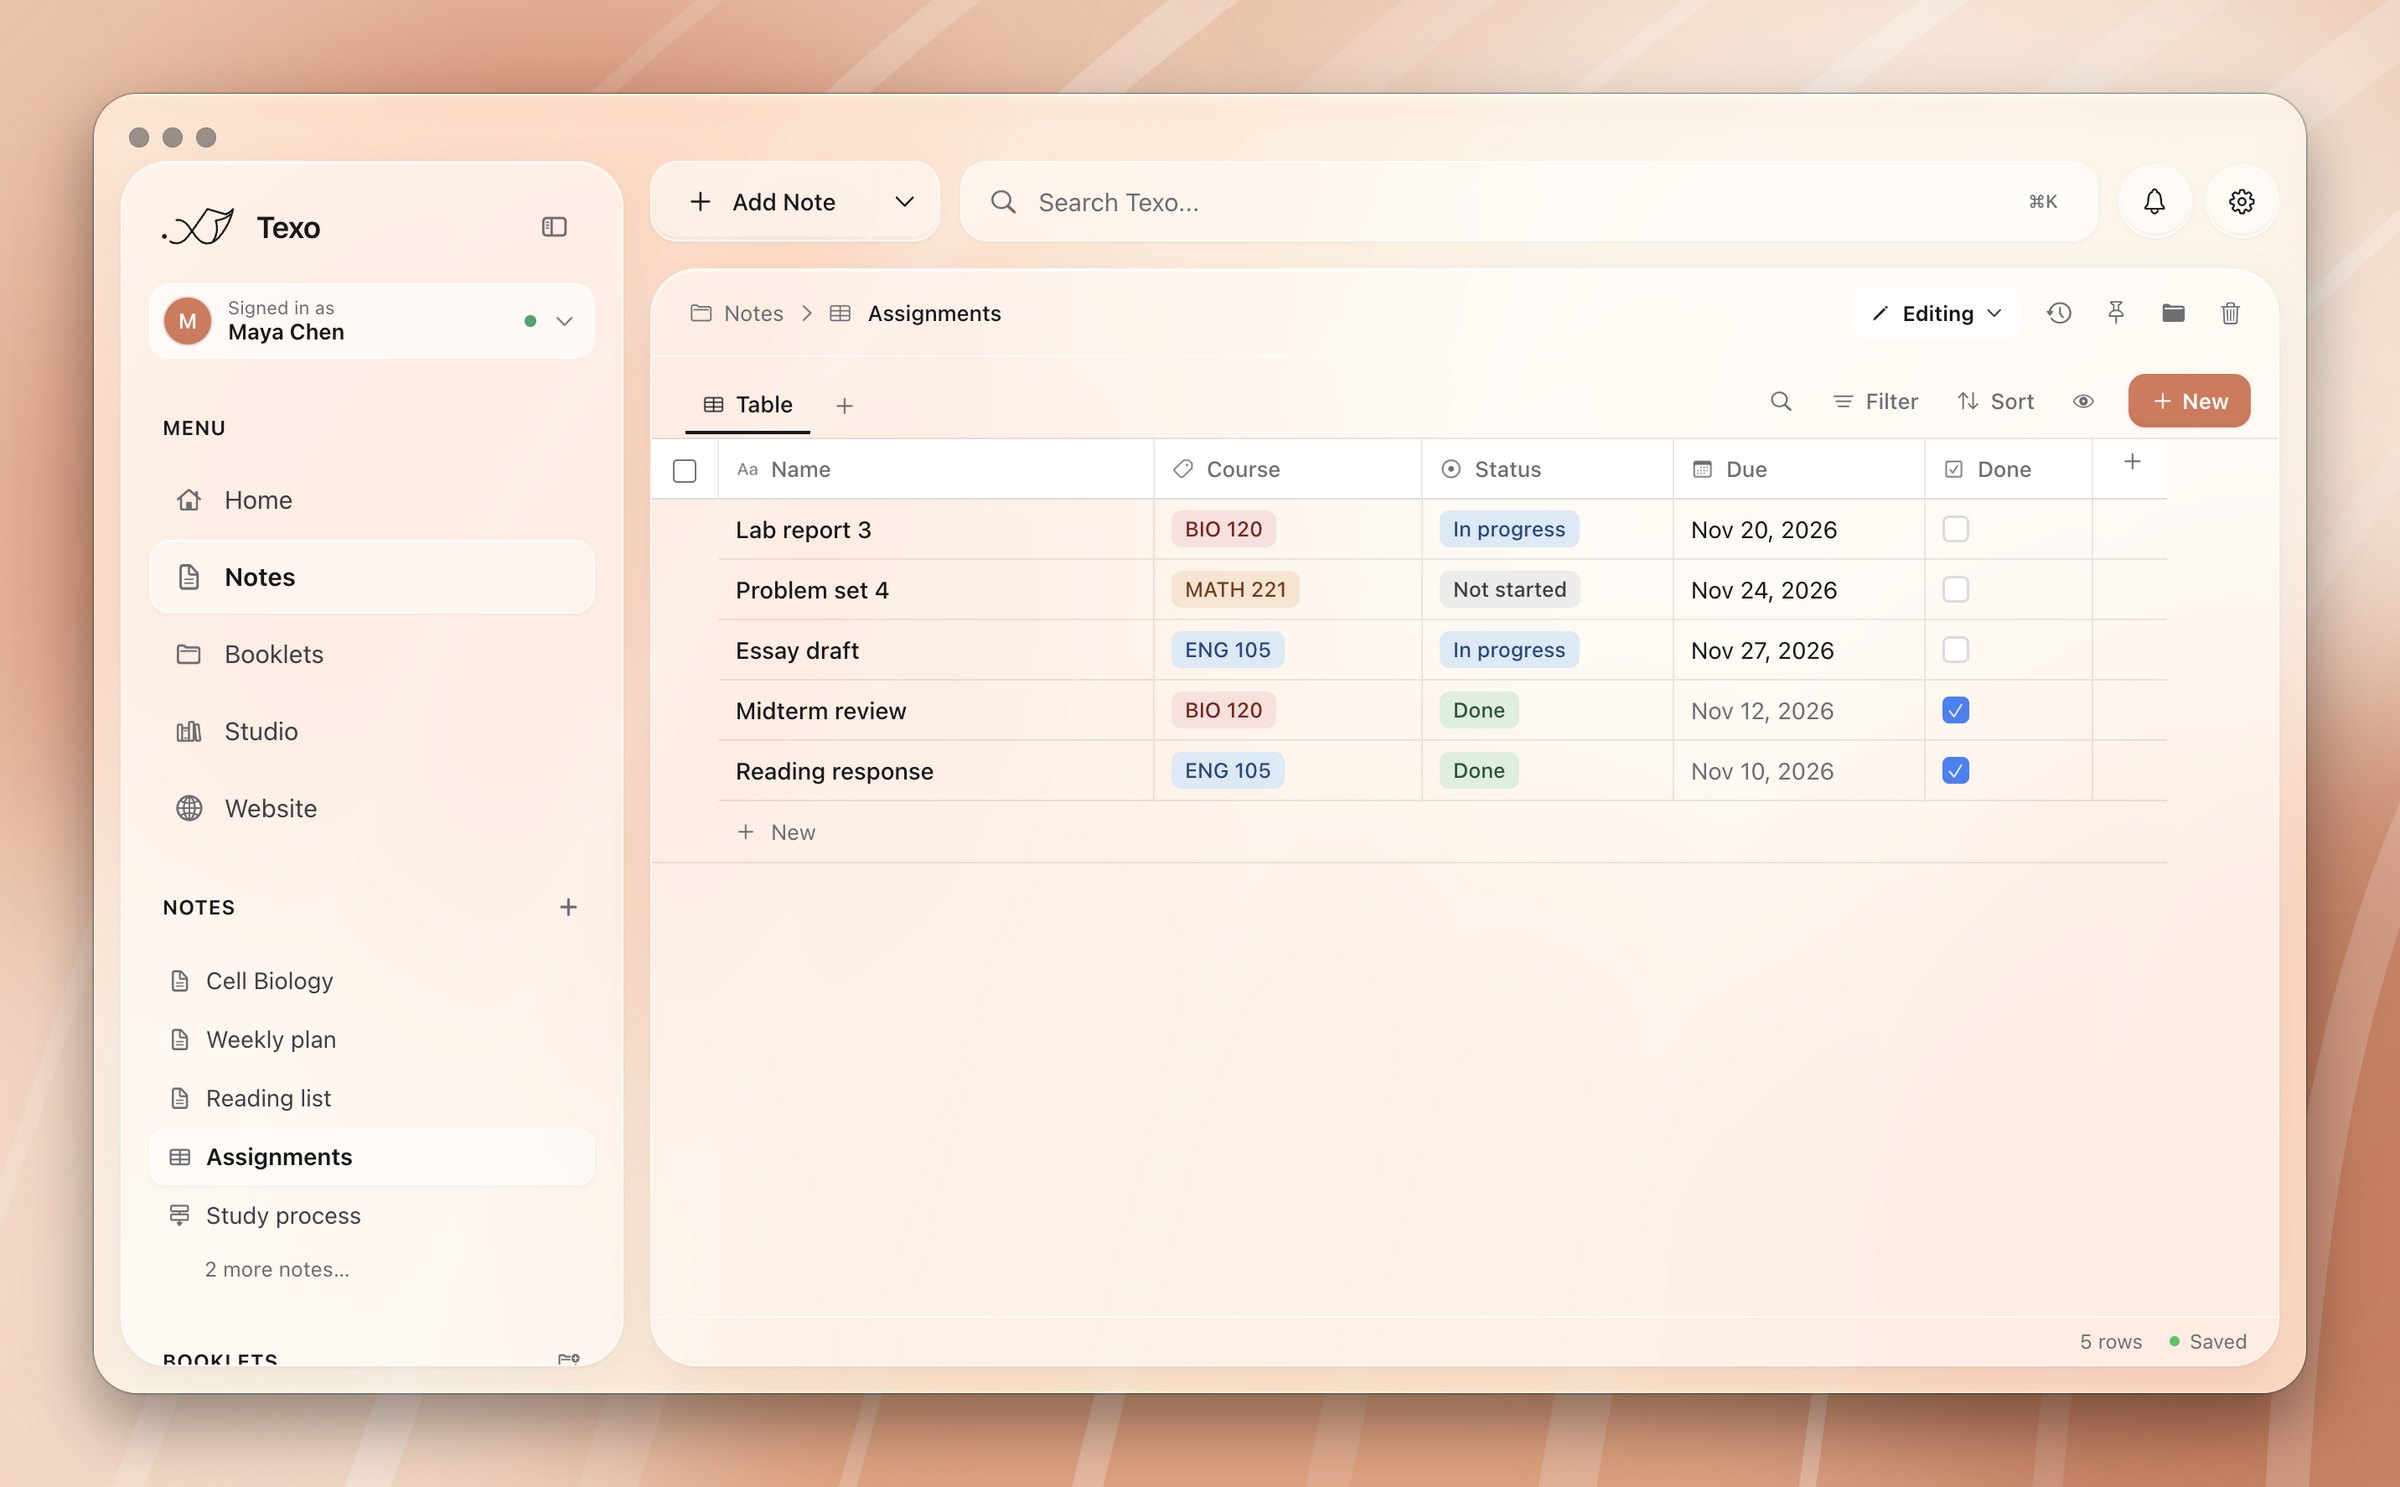
- Column types: text, number, select, multi-select, date, checkbox, URL and more.
- Views: table, board, gallery, calendar and chart.
- Tools: filter, sort, search, and a calculation at the foot of each column.
How to
- Click the arrow beside Add Note and choose Database.
- Click a column header to rename it or change its type.
- Click Add a view beside the view tabs, then pick board, gallery, calendar or chart.
- Open any row as its own page to see every field at once.
- Already have a spreadsheet? Drop it in and turn it into a database.
Flow charts
Steps, decisions, start and end shapes, and sticky notes, joined by arrows. Each step can have its own colour.
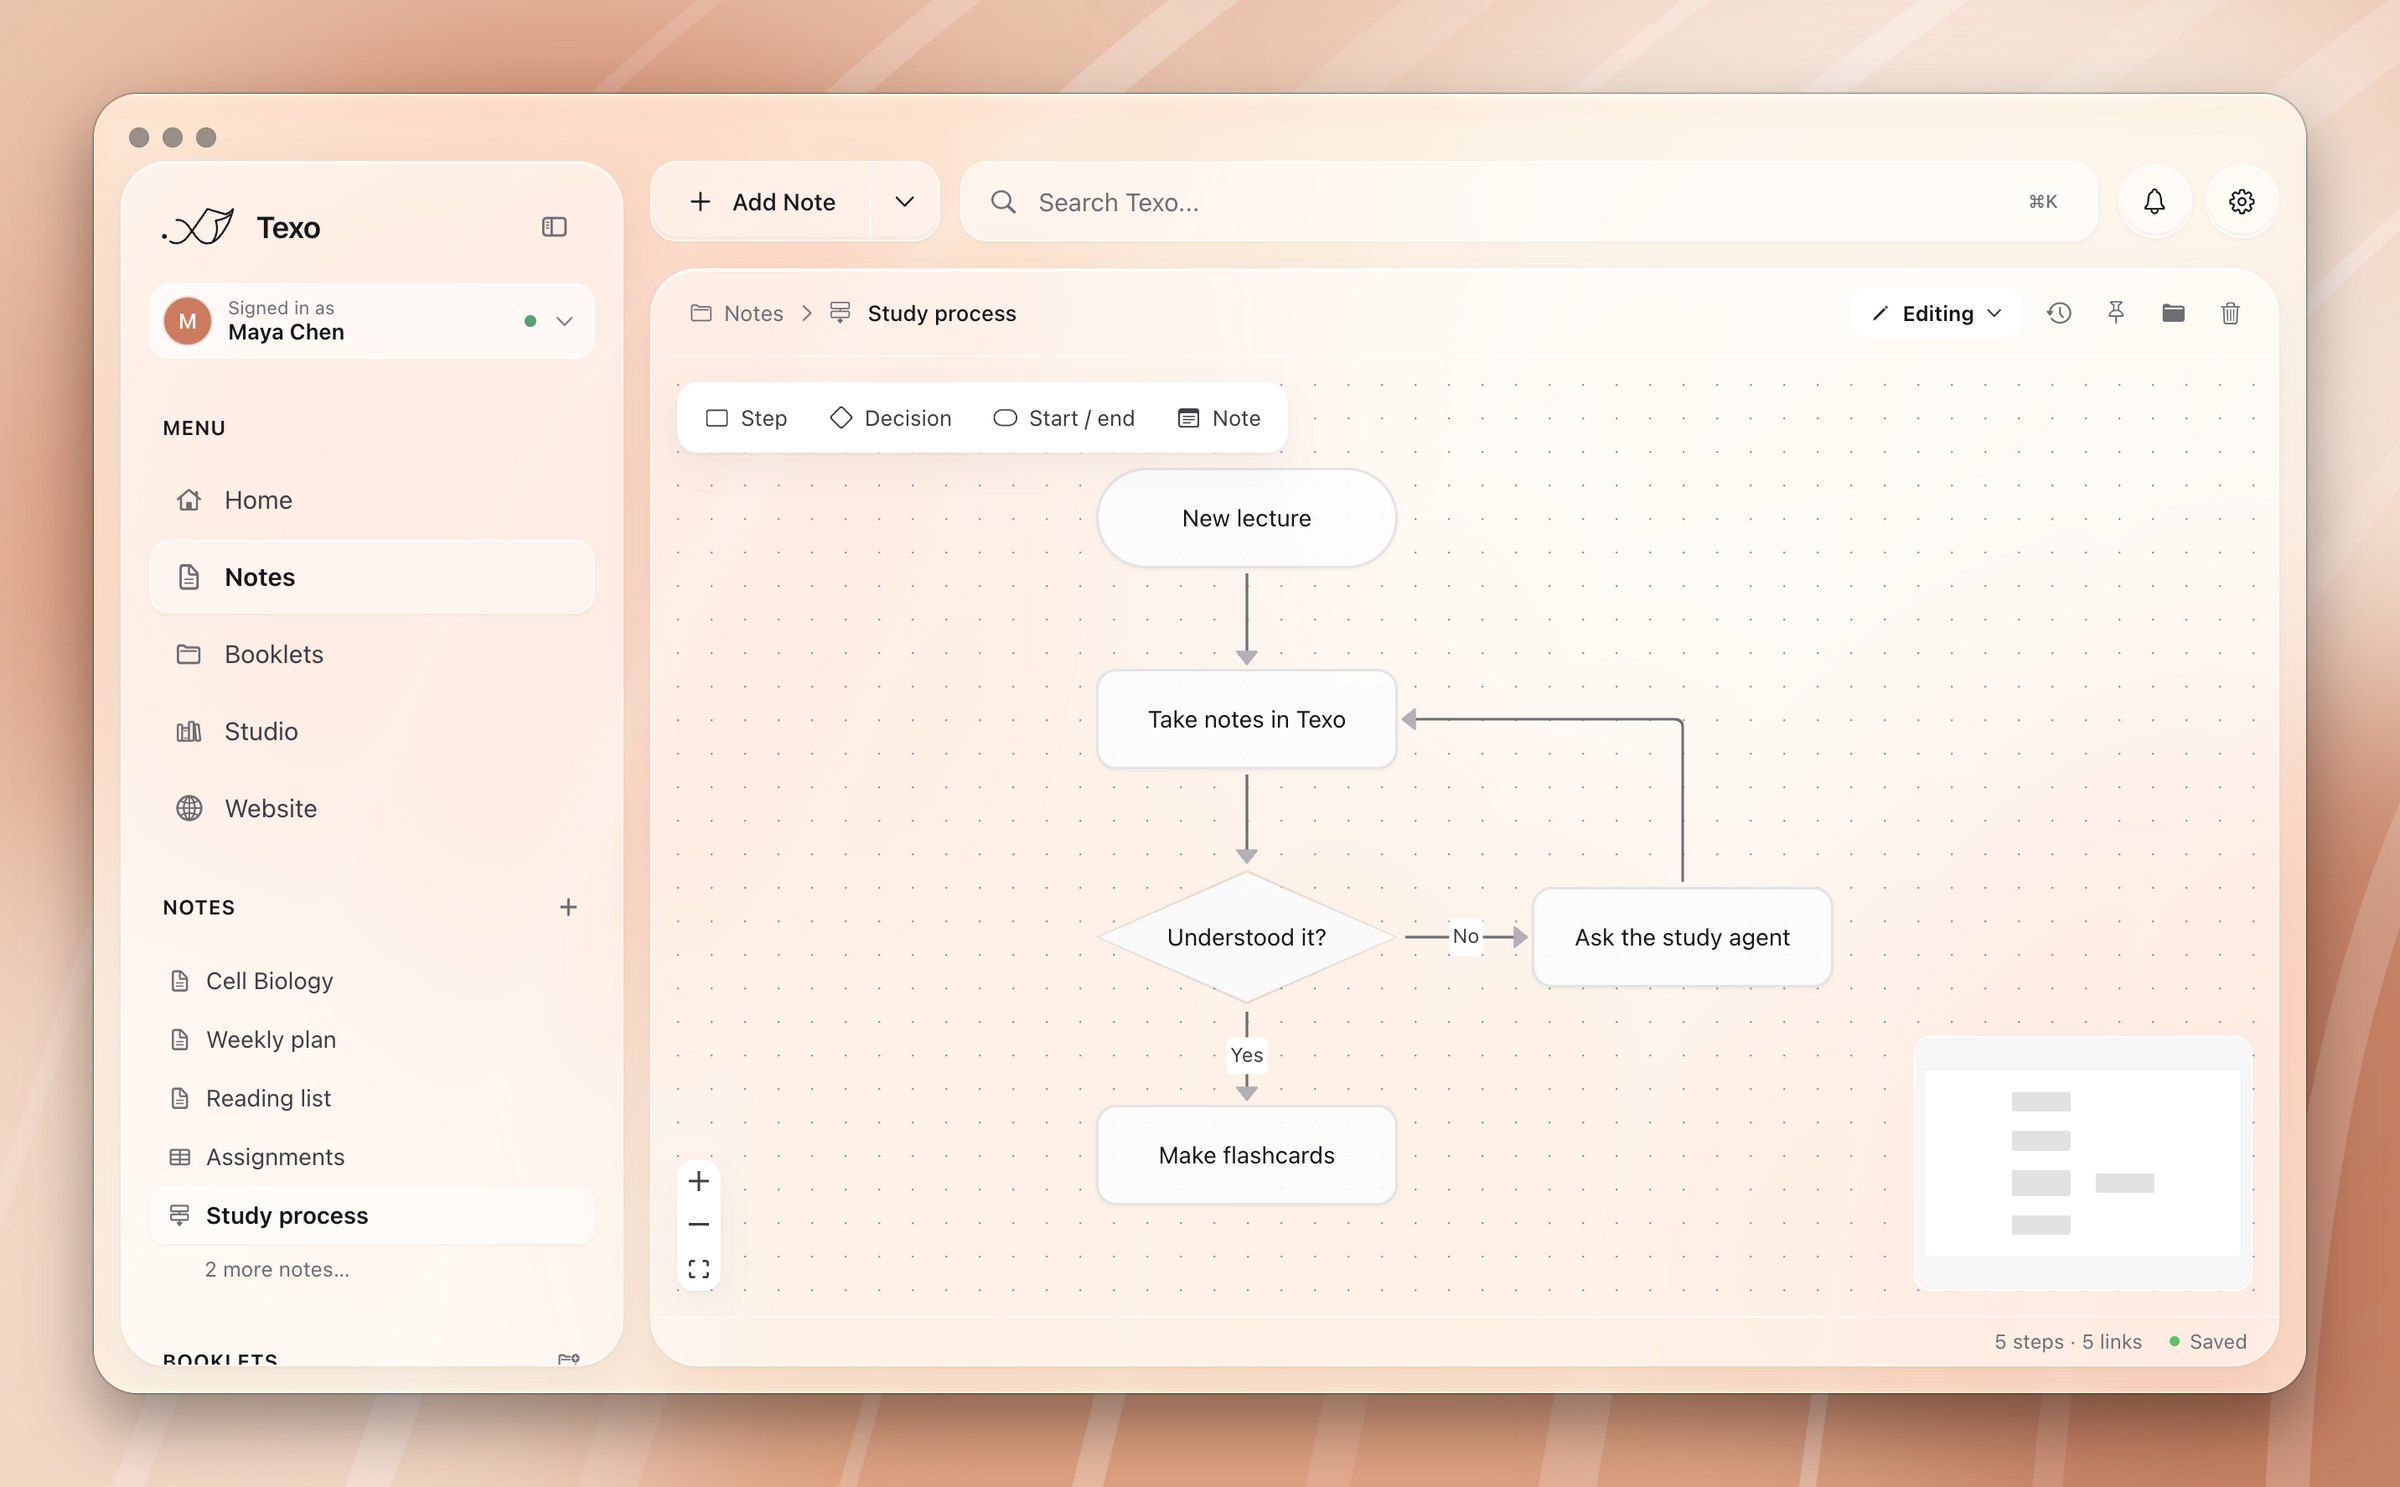
How to
- Double-click the canvas to add a step.
- Drag from a step's dot to another step to connect them.
- Double-click an arrow to label it, for example "Yes" and "No" out of a decision.
- Use the toolbar to switch between step, decision, start or end, and note.
Files
PDFs, Word and Pages documents, slides, spreadsheets, images, audio, video and plain text open inside Texo. Previews use tools built into macOS, so there is nothing extra to install.
A Word document can become an editable note. A spreadsheet can become a database.
Booklets
A booklet is a folder. Make one per class, project or team, and nest them as deep as you like, for example School/Math.
Each booklet can have an SF Symbol and a colour. The colour shows wherever the booklet appears.
How to
- Click the folder button beside Booklets in the sidebar to create one.
- Right-click a booklet and choose Change icon & colour…. Pick any symbol, one of ten colours, or a custom colour.
- Rename, move, reveal on your Mac, or move to the Trash from the same menu.
- Click a booklet to open its page, which lists everything inside it, including sub-booklets.
Home
The first page you see. You choose what's on it and how big each piece is.
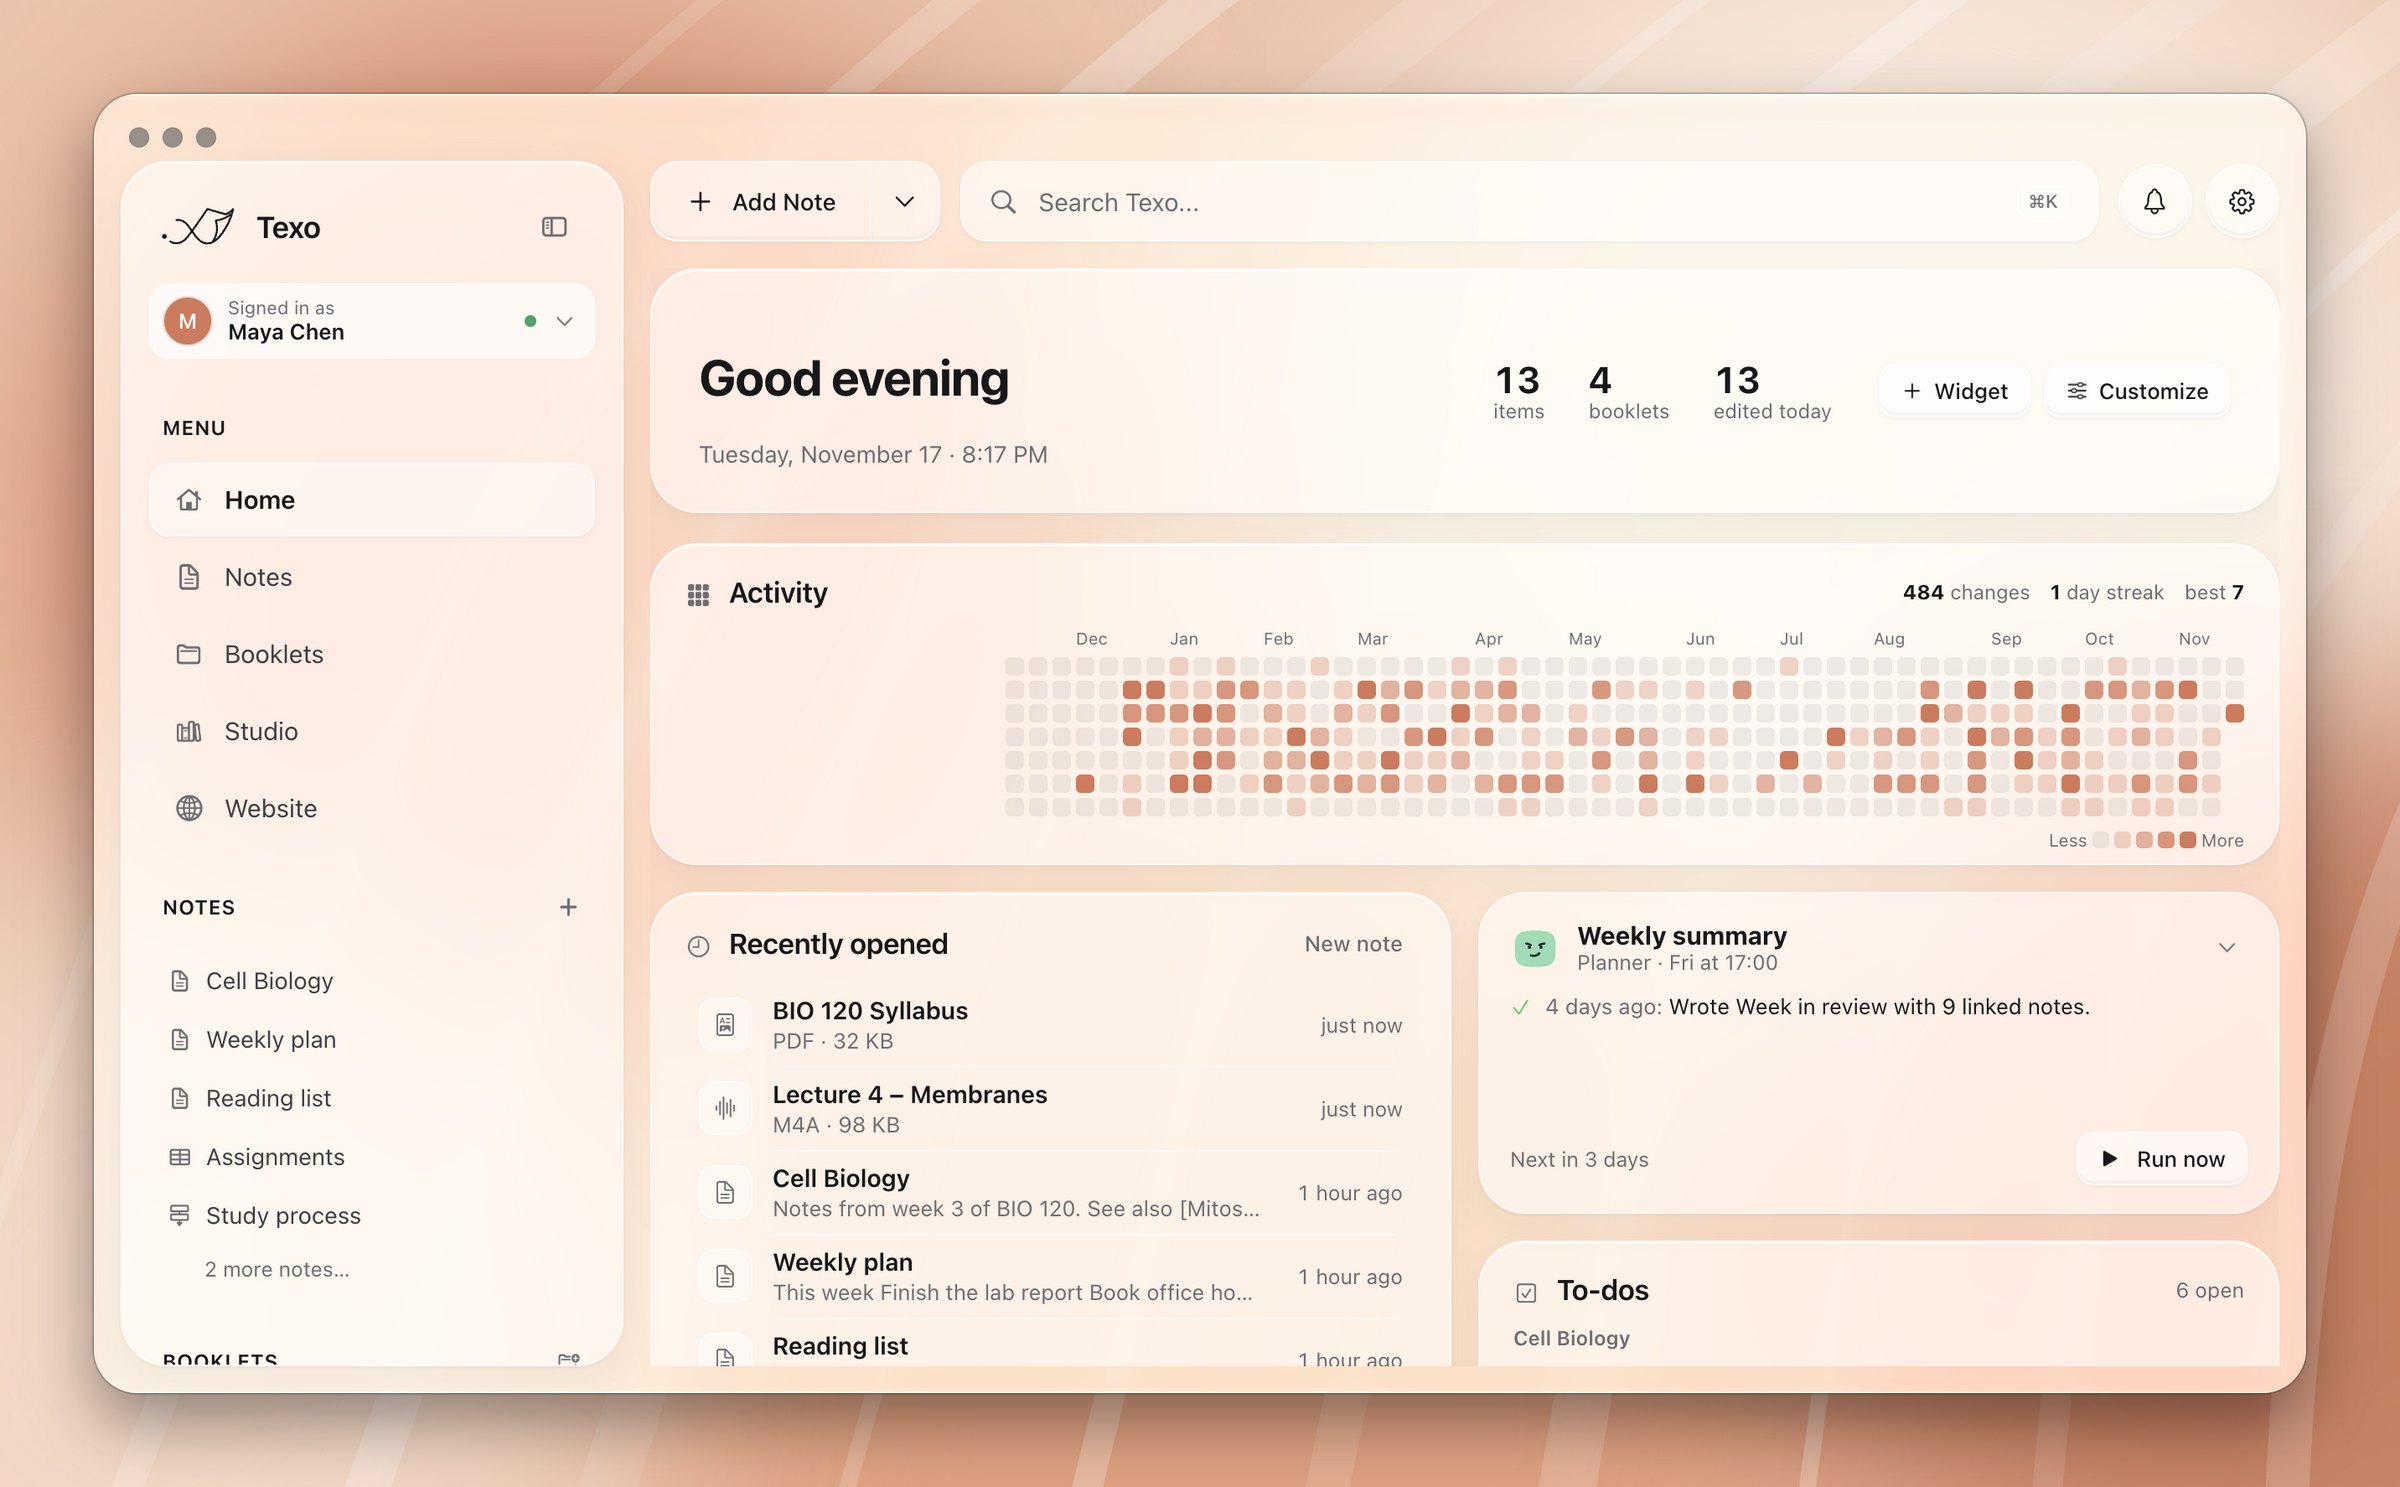
| Widget | What it shows |
|---|---|
| Recently opened | Where you left off |
| To-dos | Unchecked items from every note |
| Timer | Pomodoro, countdown or stopwatch |
| Quick capture | Writes into an Inbox note |
| Pinned item | Any item, with a live preview |
| Image, Text card | A picture or a sticky note |
| Agent automation | Its schedule, last run and a Run now button |
| Activity | A year of edits as a heatmap, with streaks. Needs GitHub sync. |
How to
- Click + Widget and pick one.
- Click Customize to drag widgets around and resize them. Click Done when finished.
Building an agent
An agent is an assistant with one job. You write the job in plain words, choose which AI it runs on, and decide what it's allowed to touch.
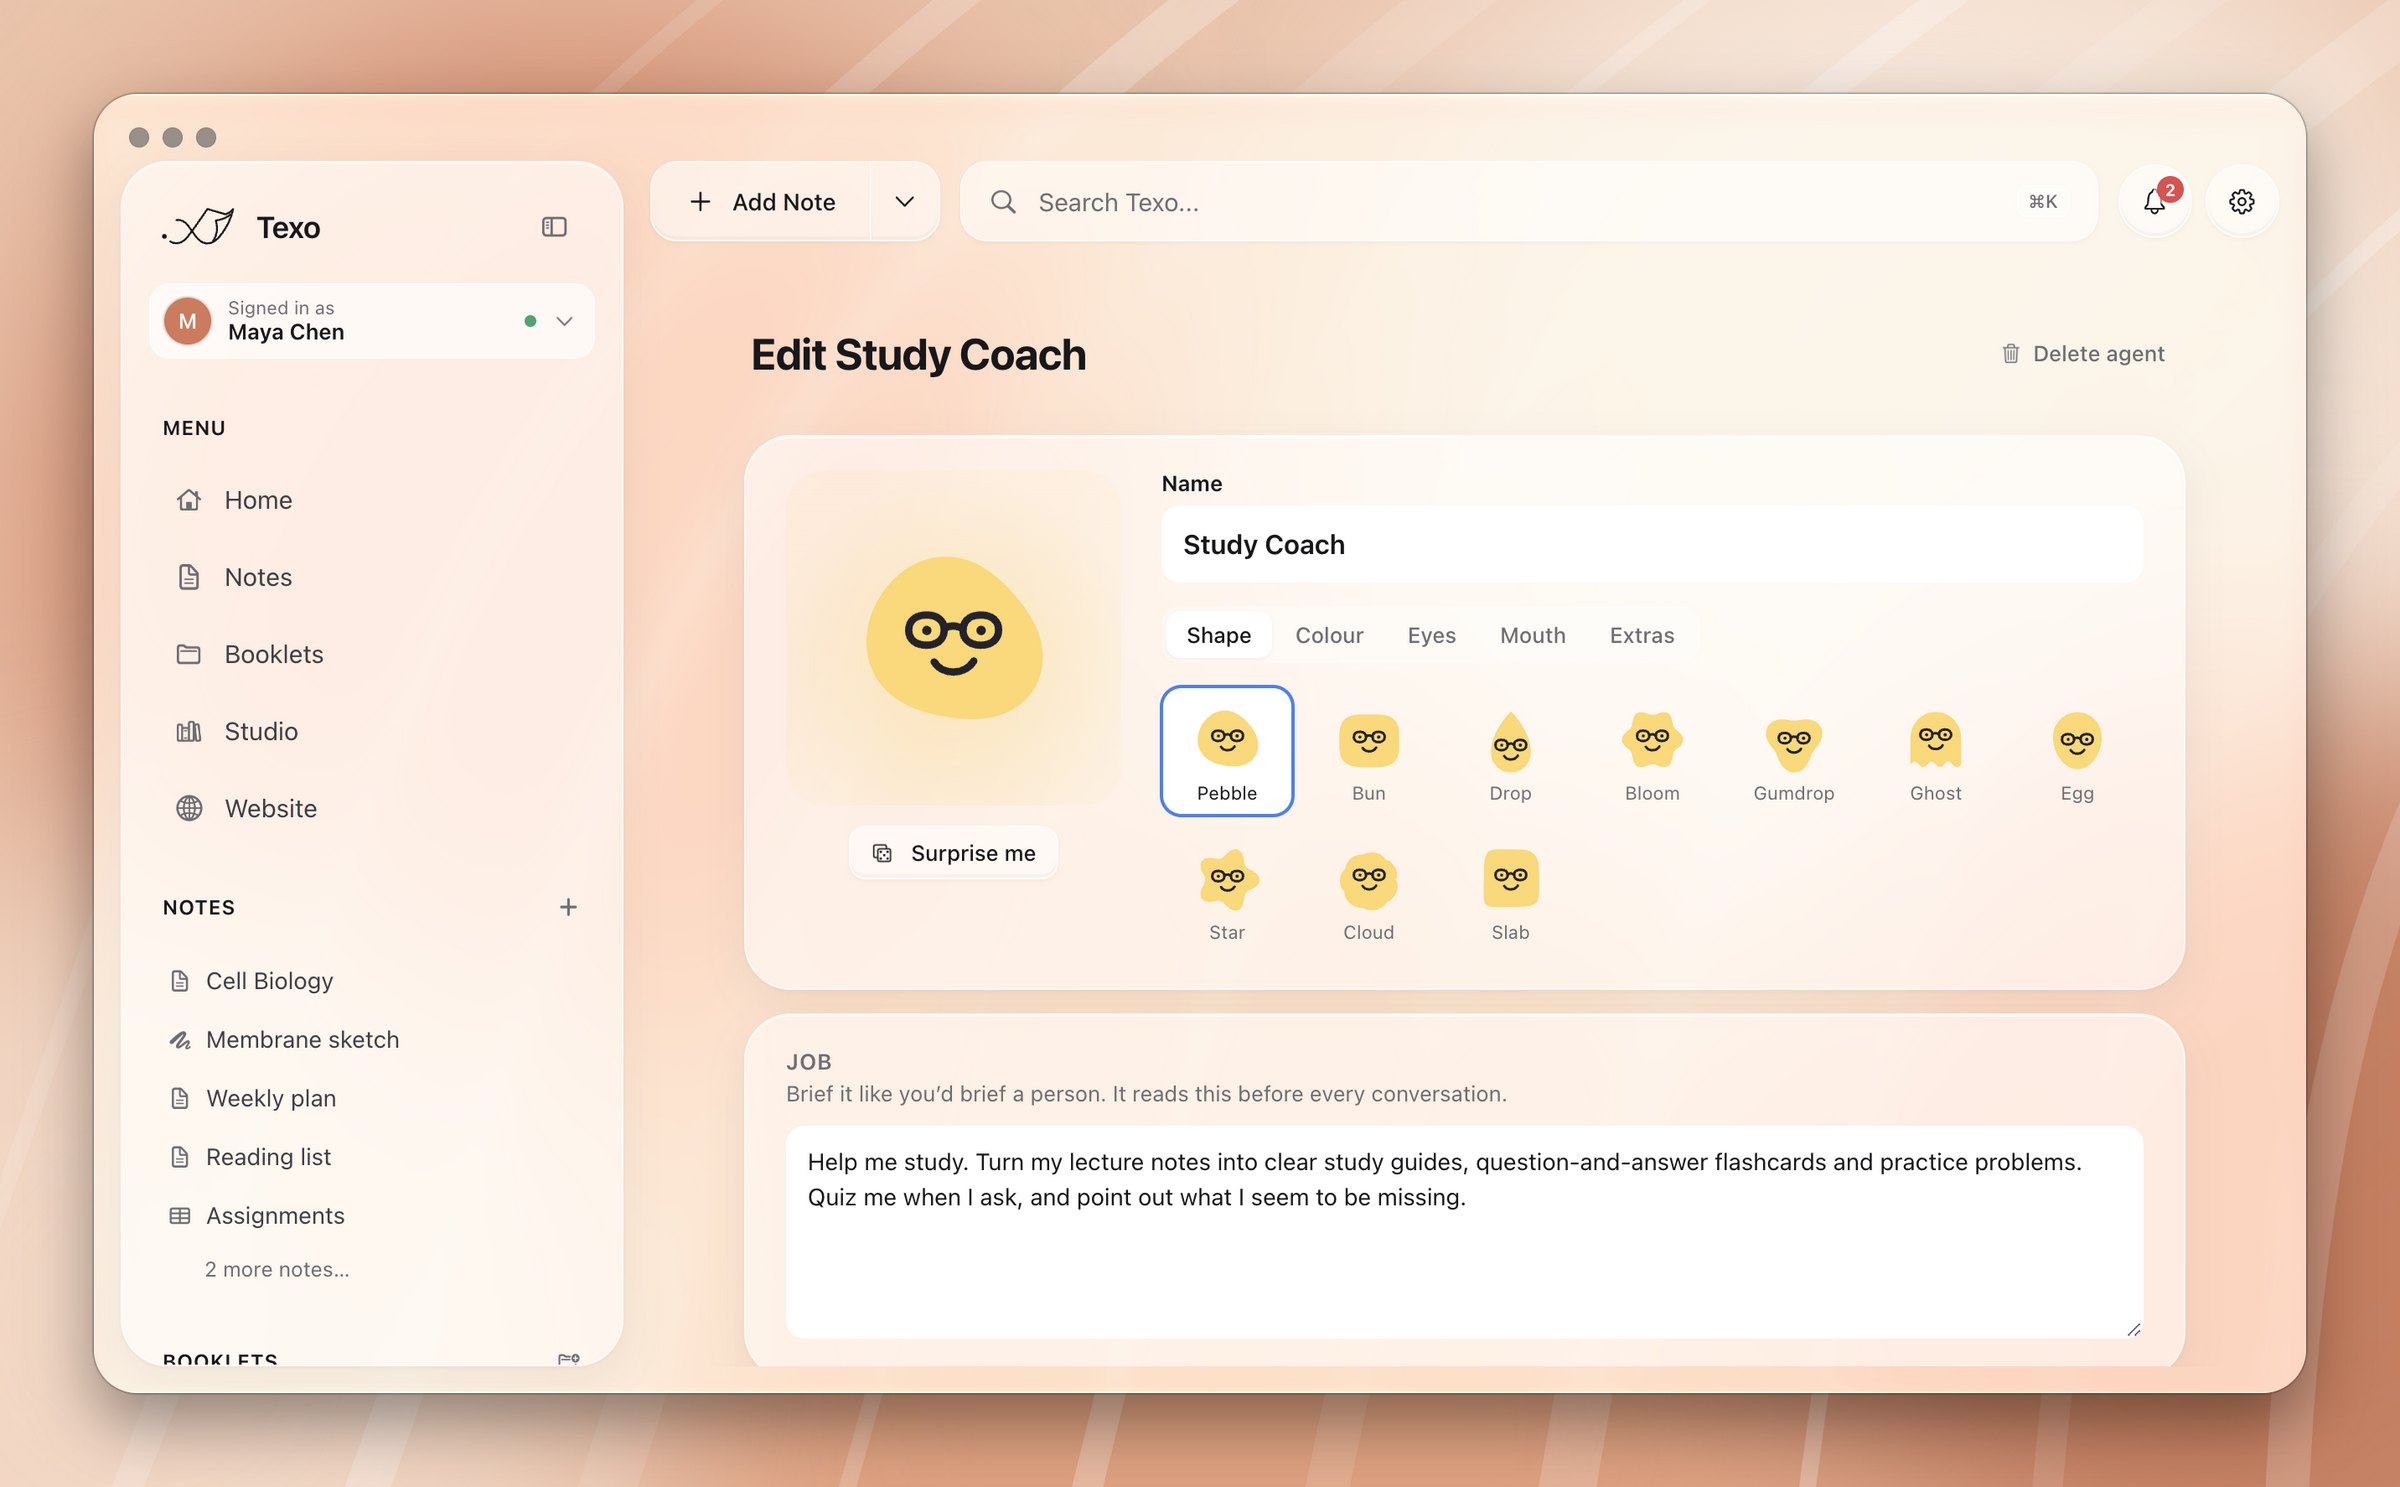
Templates cover common jobs: Study Coach, Librarian, Planner, Researcher, Editor and more. Each one is a starting point you can rewrite.
Providers
Claude, ChatGPT, Gemini, Groq, or Ollama running on your Mac. Ollama is free and keeps everything local. The others need an API key from the provider.
Two dials set each agent's behaviour. Brainpower picks a more or less capable model. Budget caps how much one task may spend. You can also pin a specific model.
How to
- Open Settings → AI providers and add a key, or the address of your Ollama server.
- In the sidebar, click + next to Agents.
- Pick a template, or skip it to start blank.
- Give the agent a name and a face: shape, colour, eyes, mouth and extras.
- Write its job. Be specific: "Turn my lecture notes into flashcards and quiz me" works better than "Help me study".
- Choose a provider, set the dials, and switch off any abilities it doesn't need.
- Click Create agent. A chat with it opens.
Where agents work
Agents can see what you're working on. They know which item is open, what you've selected, a notebook's active cell and its output, and a terminal's recent output.
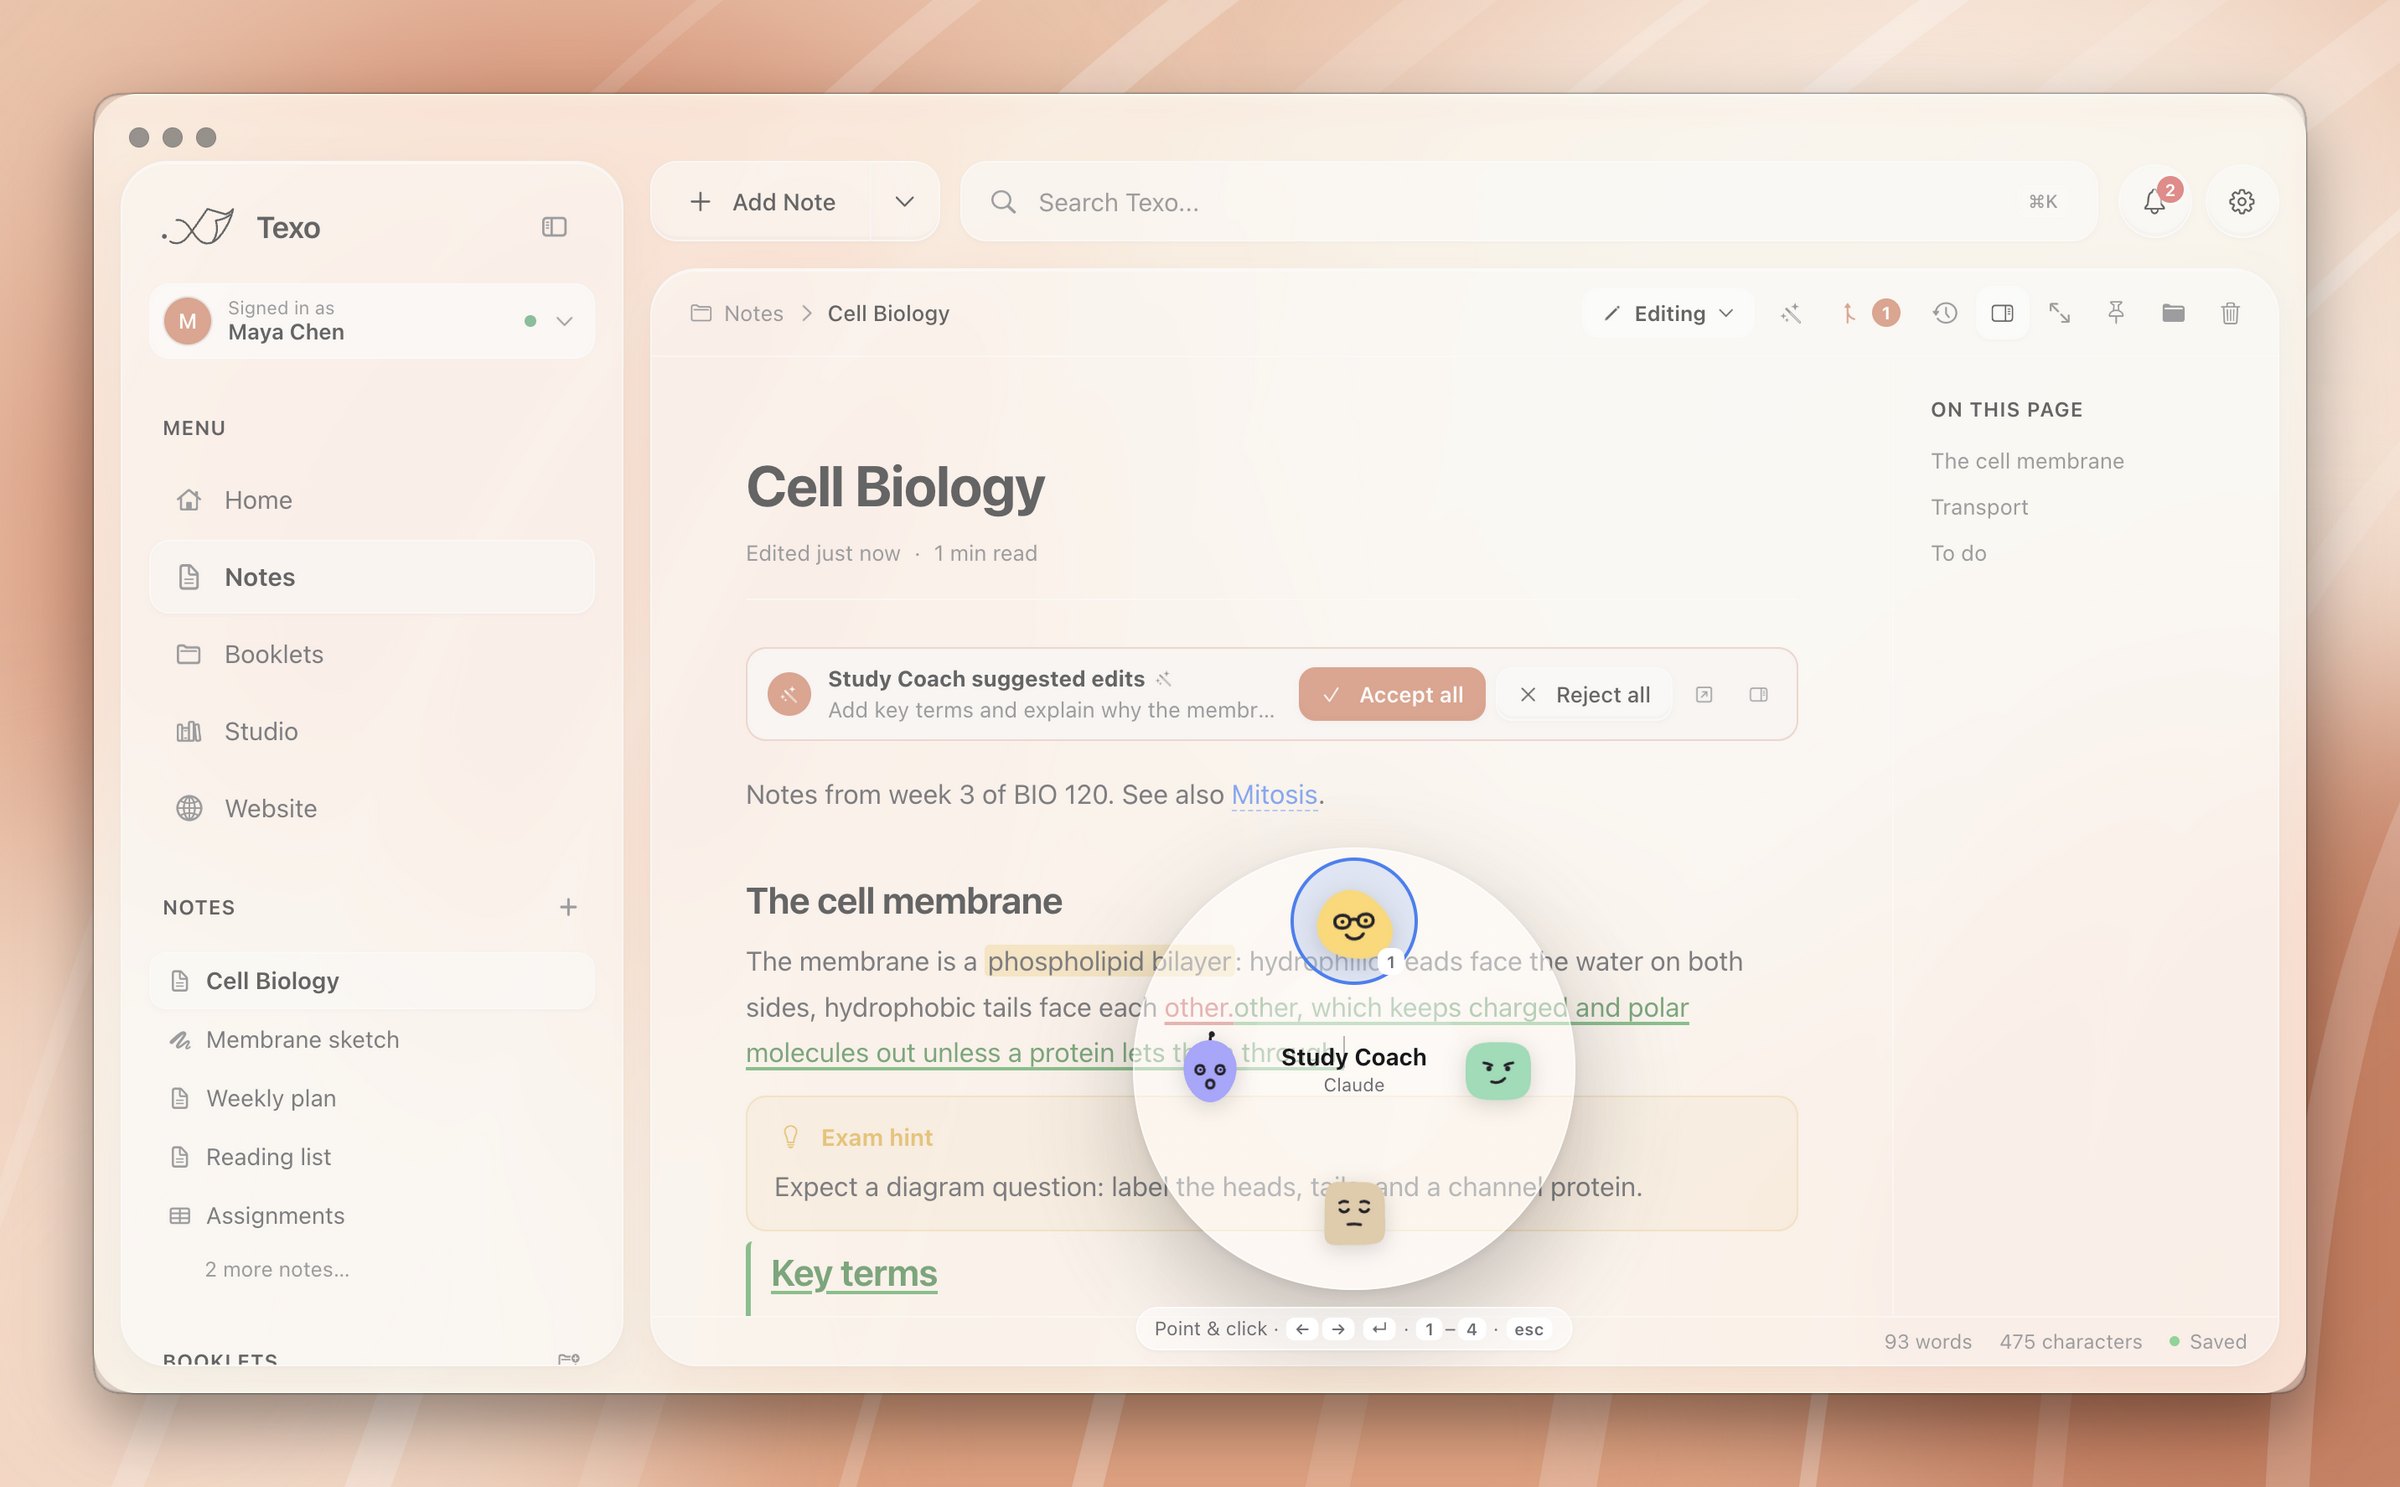
Inside a note
Press ⌘J and a wheel of your agents opens at the cursor. Pick one, then an action:
- Run: do its job on this note now, with no prompt. A Study Coach makes flashcards. An Editor tidies the writing.
- Ask: a question about the paragraph you're in.
- Write: continue from the cursor.
- Improve: rework the selected text.
- Find links: suggest related notes.
Typing / and an agent's name opens it on Ask.
In a chat
Each step the agent takes appears as it happens: what it searched, what it read, what it changed. Under every task you see the tokens used, an estimated price, the number of steps and how long it took.
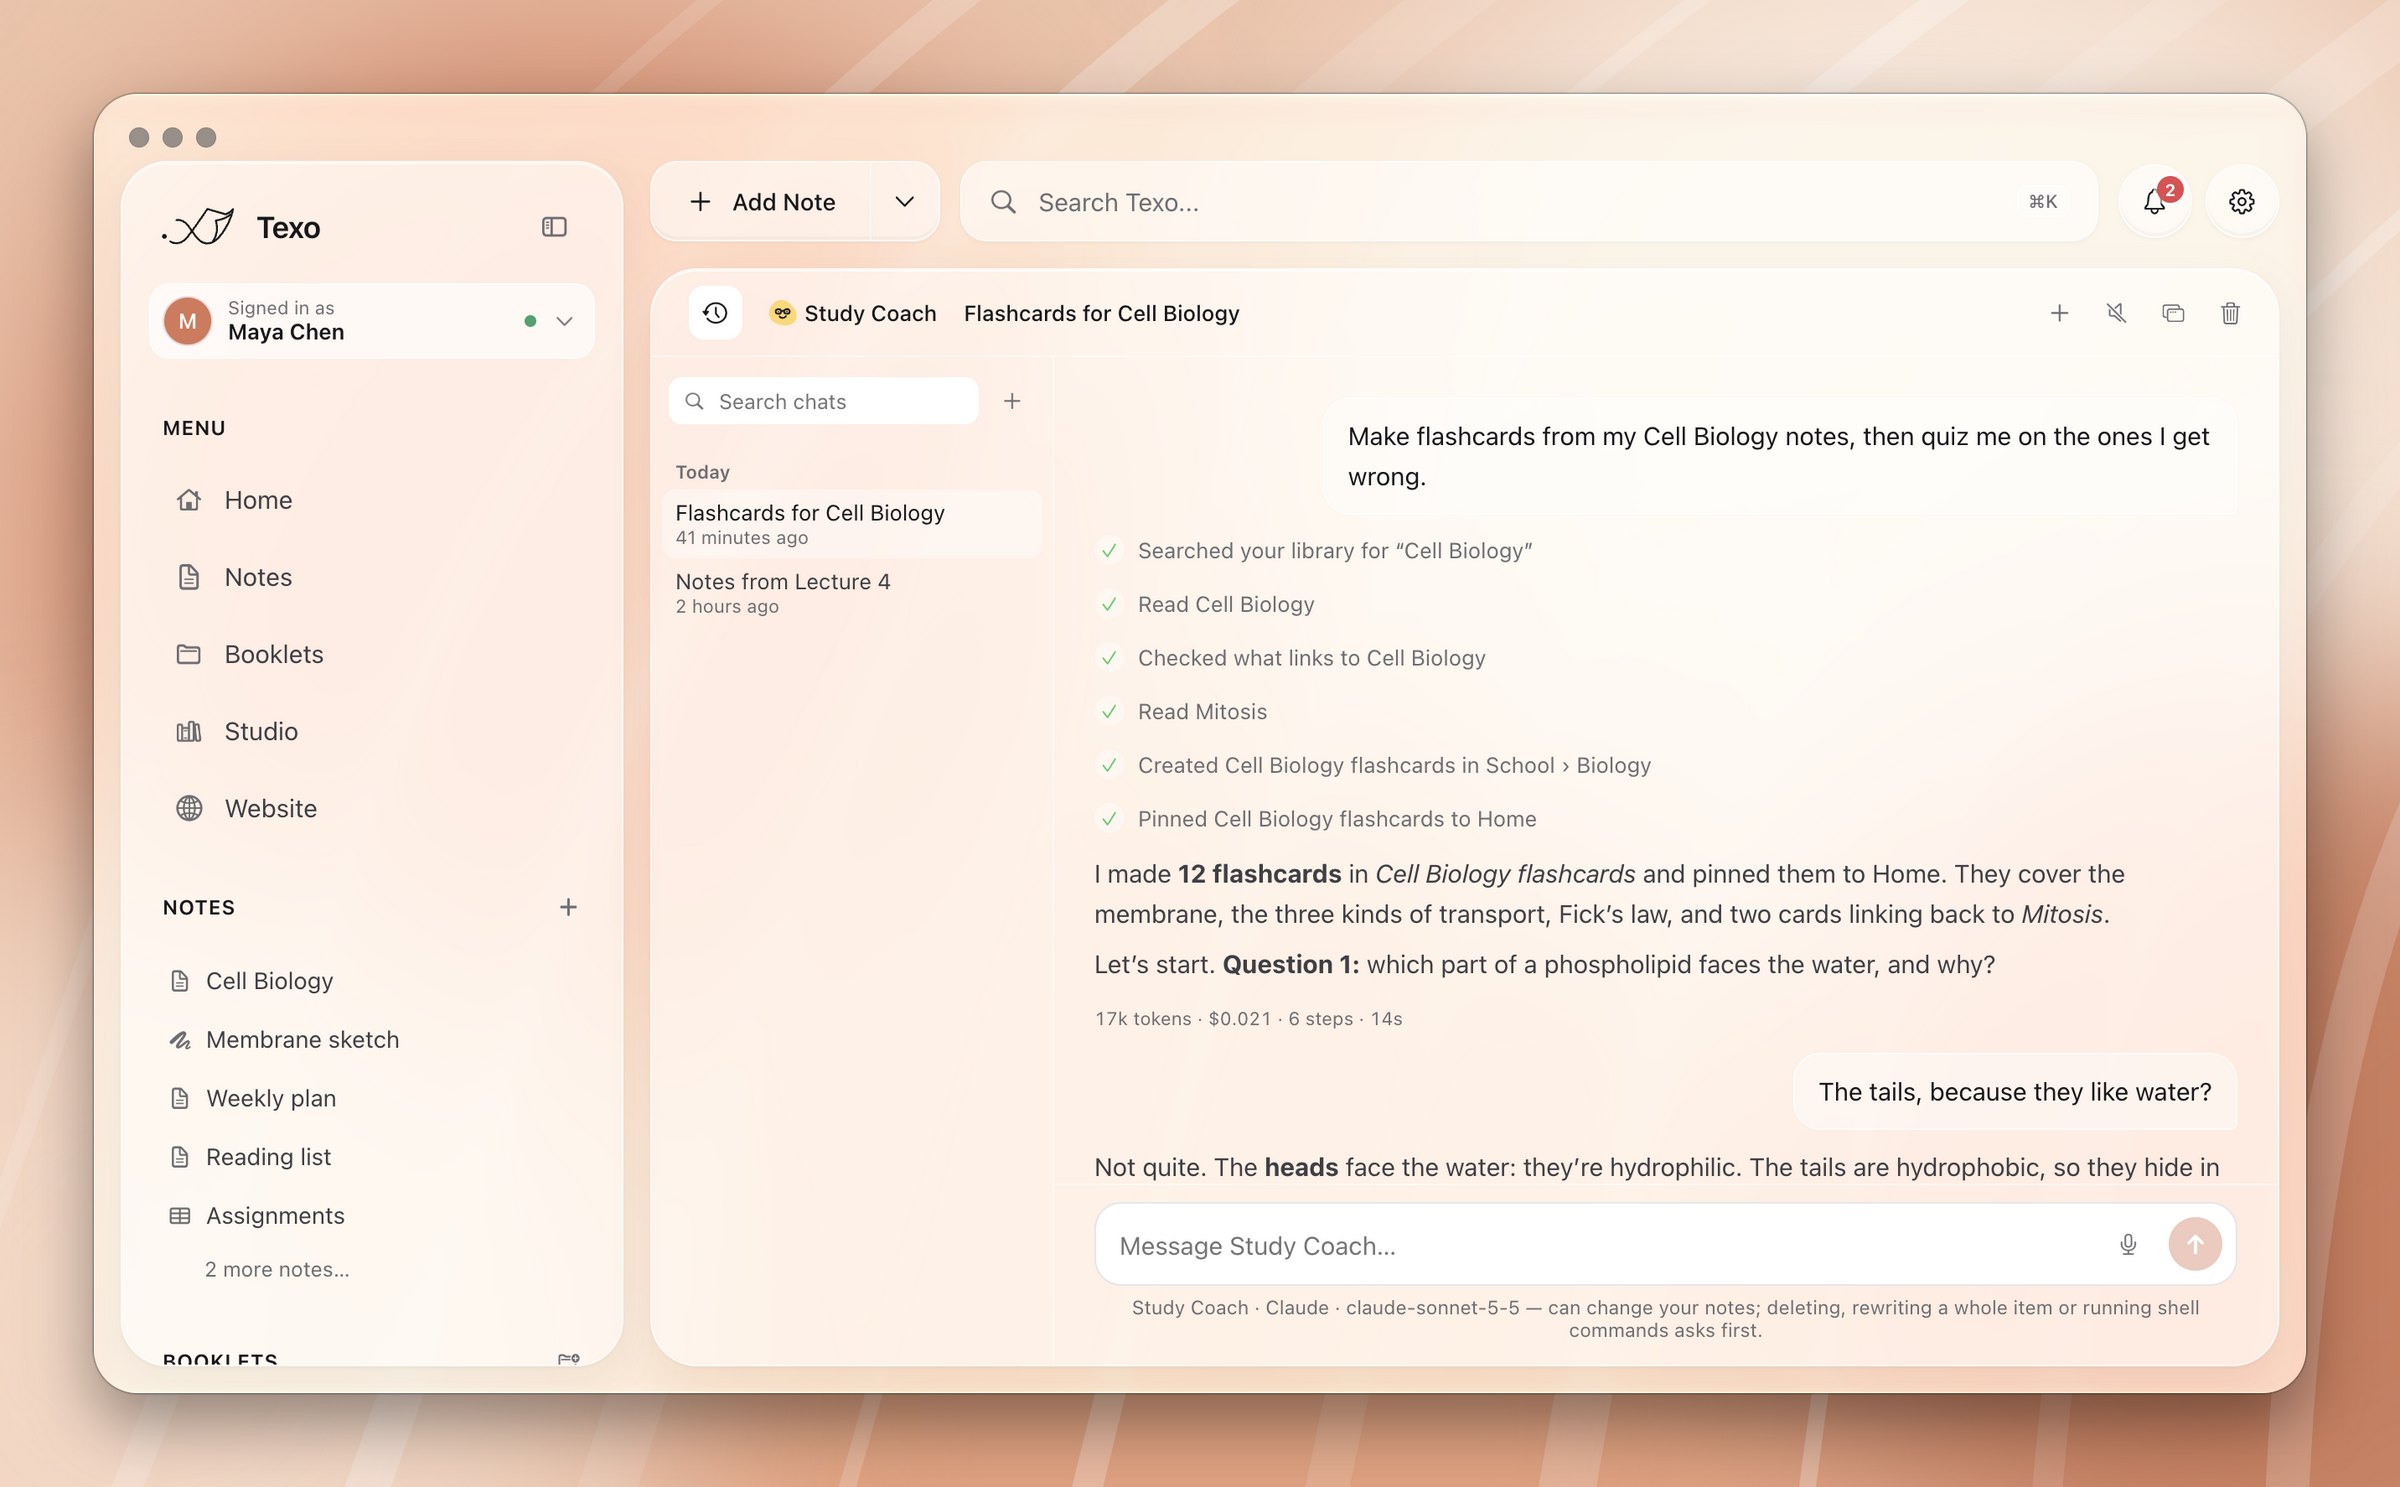
If a request is unclear, the agent asks, with answers to pick from. You can speak a message with the mic button and have replies read aloud in one of your Mac's voices.
How to
- Start a chat: click an agent in the sidebar.
- Find an old chat: open the chats panel beside the conversation. Chats are searchable and grouped by day.
- Keep a chat on screen: pop it out into its own small window. It can float above other apps while the agent keeps working in the main window.
Automations
An automation is a saved task that an agent runs on its own. It can run on a schedule, every few hours, when items are added or changed in a booklet, or when Texo opens.
Examples: "Every Friday at 17:00, write a weekly summary of what I changed." "When a new note lands in School, make flashcards for it."
Automations always send a macOS notification when they finish. Big changes arrive as suggestions instead of being written straight in.
How to
- On Home, click + Widget and choose Agent automation.
- Name it, pick the agent, and write the task as you'd say it.
- Pick when it runs.
- Save. The widget shows the next run. Run now runs it immediately.
- Or just ask an agent: "remind me every Monday to plan the week". It can schedule tasks for itself.
Abilities
Every ability can be switched off per agent. A switched-off ability removes those tools from the agent entirely. It can't use what it doesn't have.
| Ability | What it allows |
|---|---|
| Read | Always on. Search and read every item, PDFs page by page, slides, transcripts, images, backlinks, tags and version history. |
| Write | Create and edit items. Flow charts, drawings and notebooks are changed one operation at a time ("add a step after X") rather than rewritten. |
| Organize | Rename and move items. Create and rename booklets. |
| Databases | Add, update and delete rows. Add, rename and retype columns. Sort and filter views. |
| Delete | Move things to the Trash. Always asks first. |
| Web | Search the web and read pages. DuckDuckGo works without a key. Google and Brave need one, set in Settings → AI providers → Web search. |
| Run code | Run notebook cells, and shell commands on your Mac. Every shell command asks first. |
| Control the app | Open items, pin them to Home, switch the theme, send you notifications, schedule tasks. |
| GitHub | Propose changes for review, restore old versions, recover deleted items, sync, publish the website. |
More abilities are on the way.
Memory and cost
Memory
Tell an agent something worth keeping, like an exam date or how you want questions asked, and it saves it for future chats. Each fact is a short line you can read.
How to
- Hover the agent in the sidebar, click ⋯, then Edit agent.
- Scroll to Memory to read, edit or clear what it remembers.
Cost
Every task shows its tokens and an estimated price, based on the provider's list prices. Settings → AI providers → Usage & cost breaks down this month and the last 30 days by agent and by model. Local models through Ollama cost nothing.
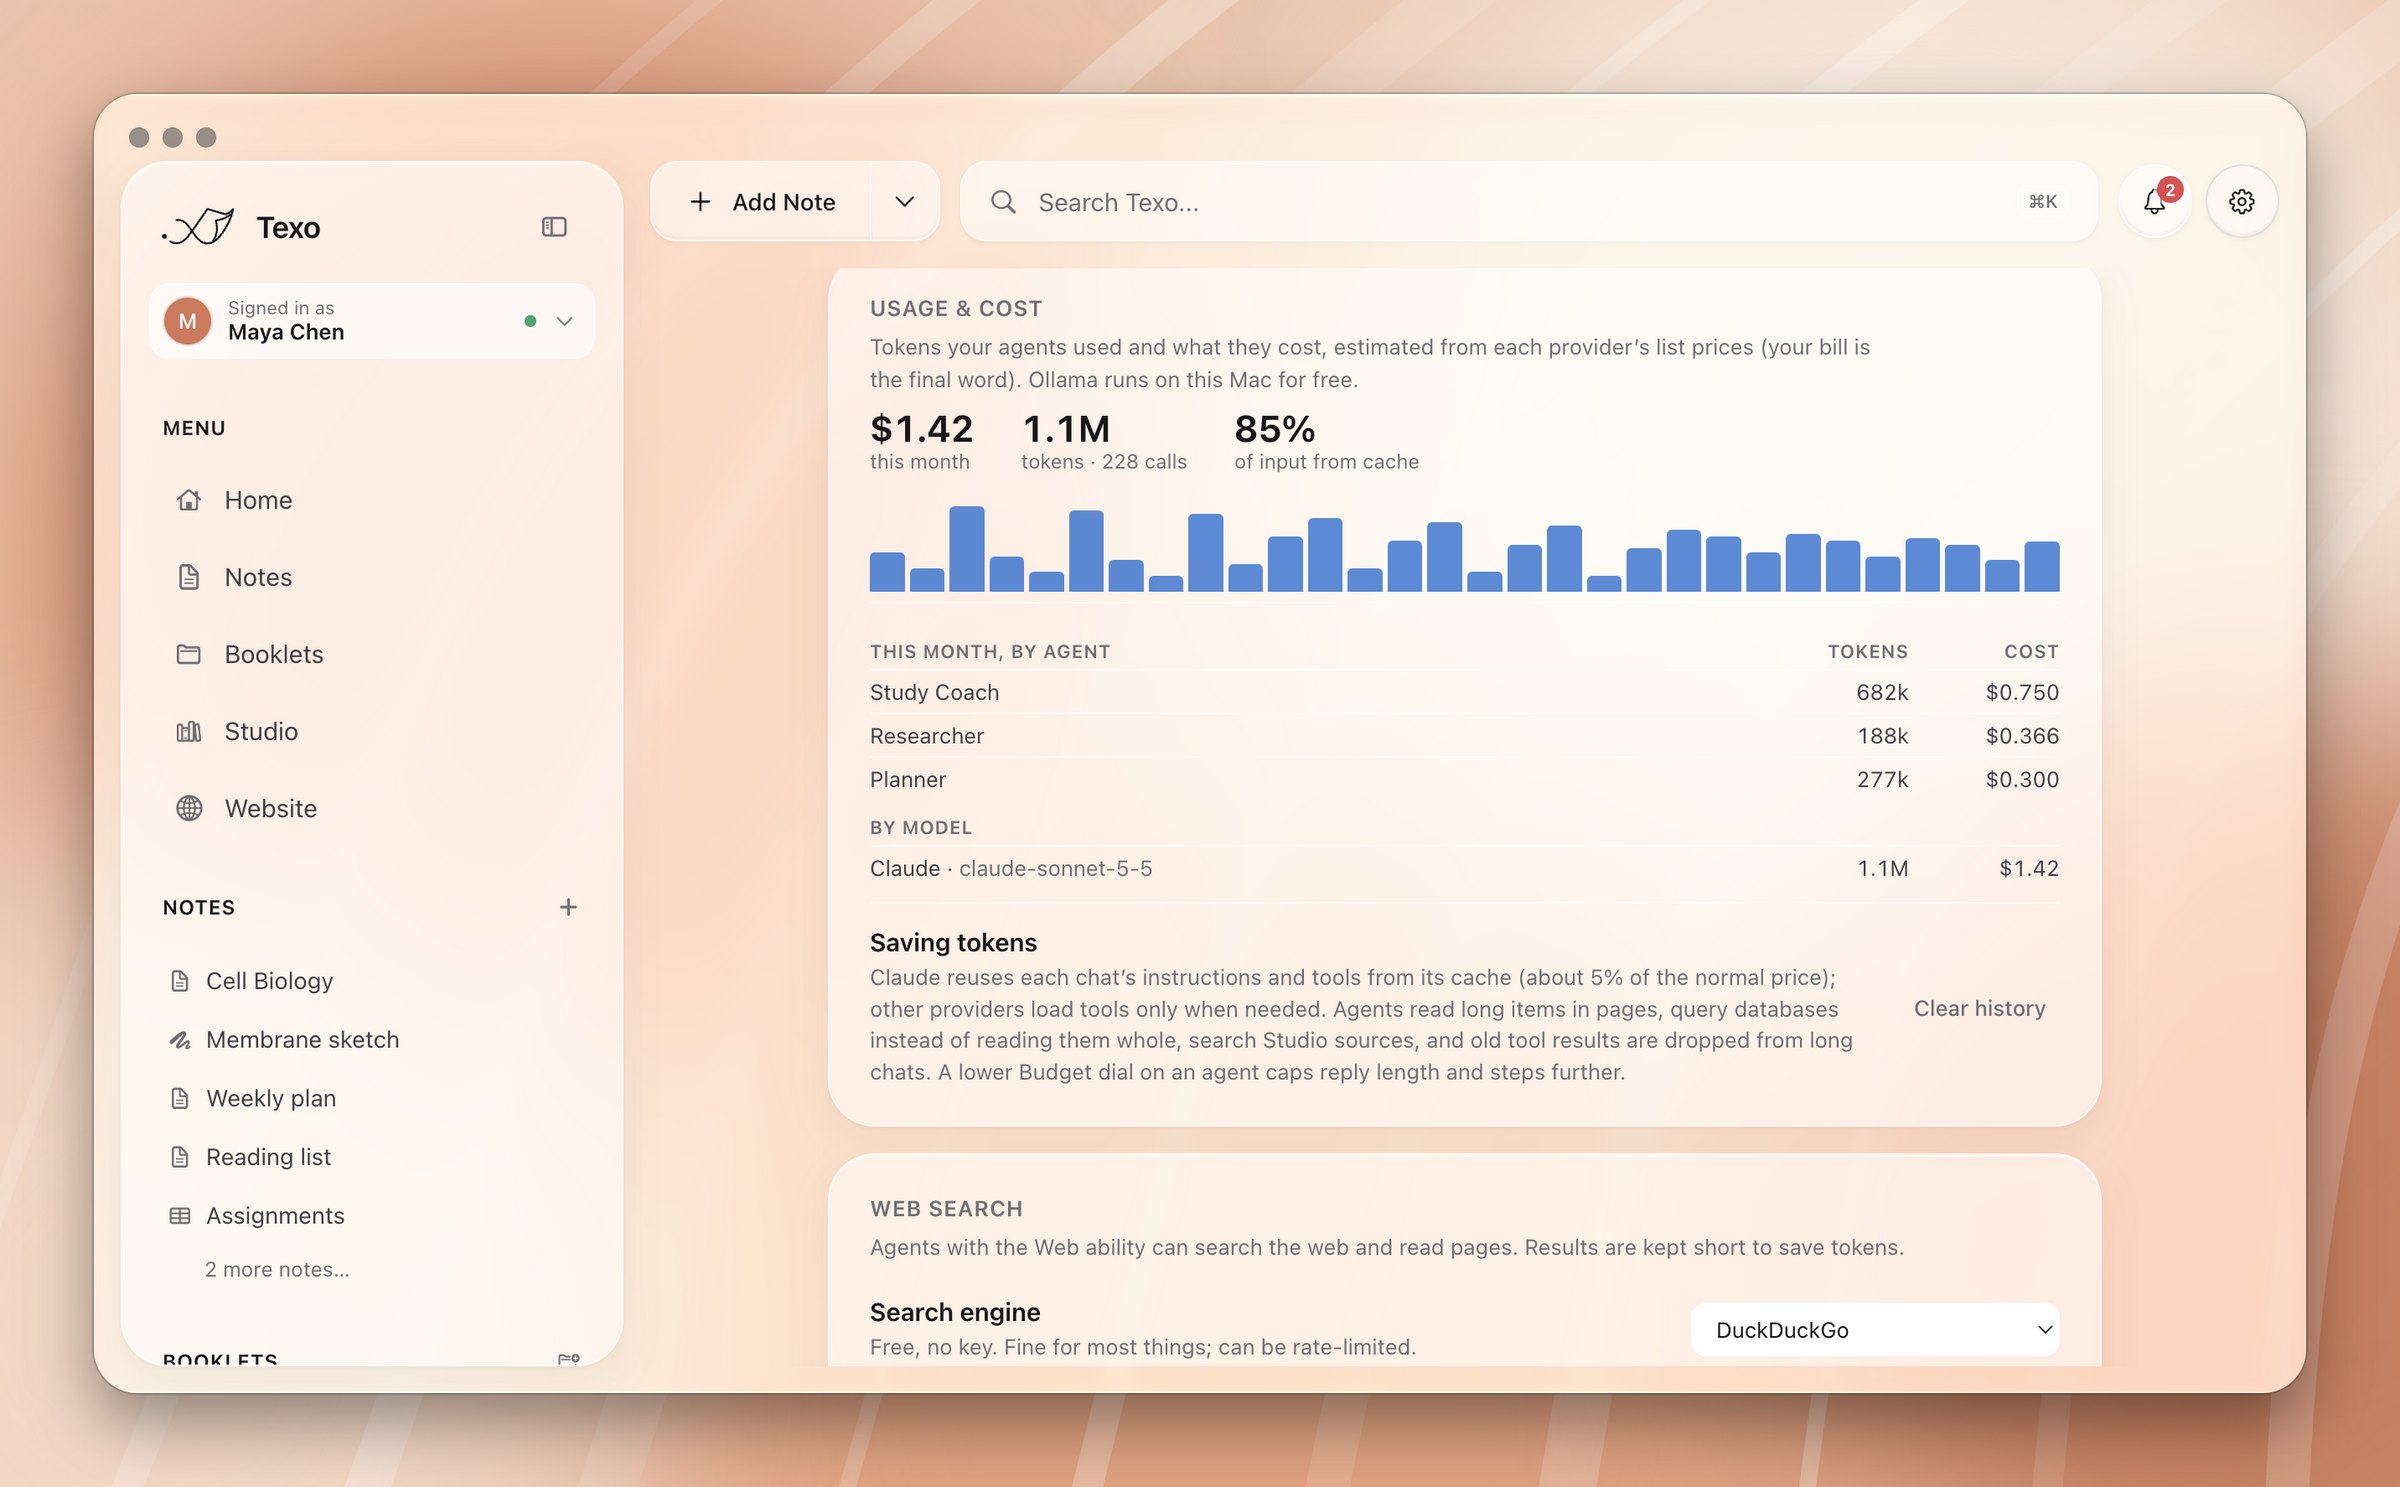
Agents are built to spend little. Claude reuses each chat's instructions from its cache, which costs about a tenth of the normal price. Long items are read in pages, databases are queried instead of read whole, and old tool results are dropped from long chats.
Studio
A research project built on your own sources. The agent answers only from what you've added, and cites it.
- Sources: notes, PDFs, slides, recordings with transcripts, web pages or pasted text.
- Ask: answers come with numbered citations. Click one to open the source.
- Make: an audio overview with two hosts, a study guide, briefing, FAQ, timeline, mind map, flashcards or a quiz. Each is saved as an item with what it cost.
Small sets of sources are handed to the agent whole. Large sets are searched passage by passage, which keeps the cost down.
How to
- Open Studio in the sidebar and click New project.
- Add sources, or start from a booklet so everything in it becomes a source.
- Untick any source you want left out.
- Ask a question, or pick something to make.
Recording
Record a lecture or meeting, then transcribe it with Groq Whisper, OpenAI Whisper or Gemini. Gemini also labels who is speaking. The transcript is kept with the recording.
How to
- Click the arrow beside Add Note and choose Record audio.
- Stop when you're done, then transcribe. Settings → Recording can do this automatically.
- Click any line of the transcript to jump to that moment.
- Ask an agent to turn the transcript into notes.
Sync
Texo syncs your library through a GitHub repository in your own account. It's free, and the repository can be private.
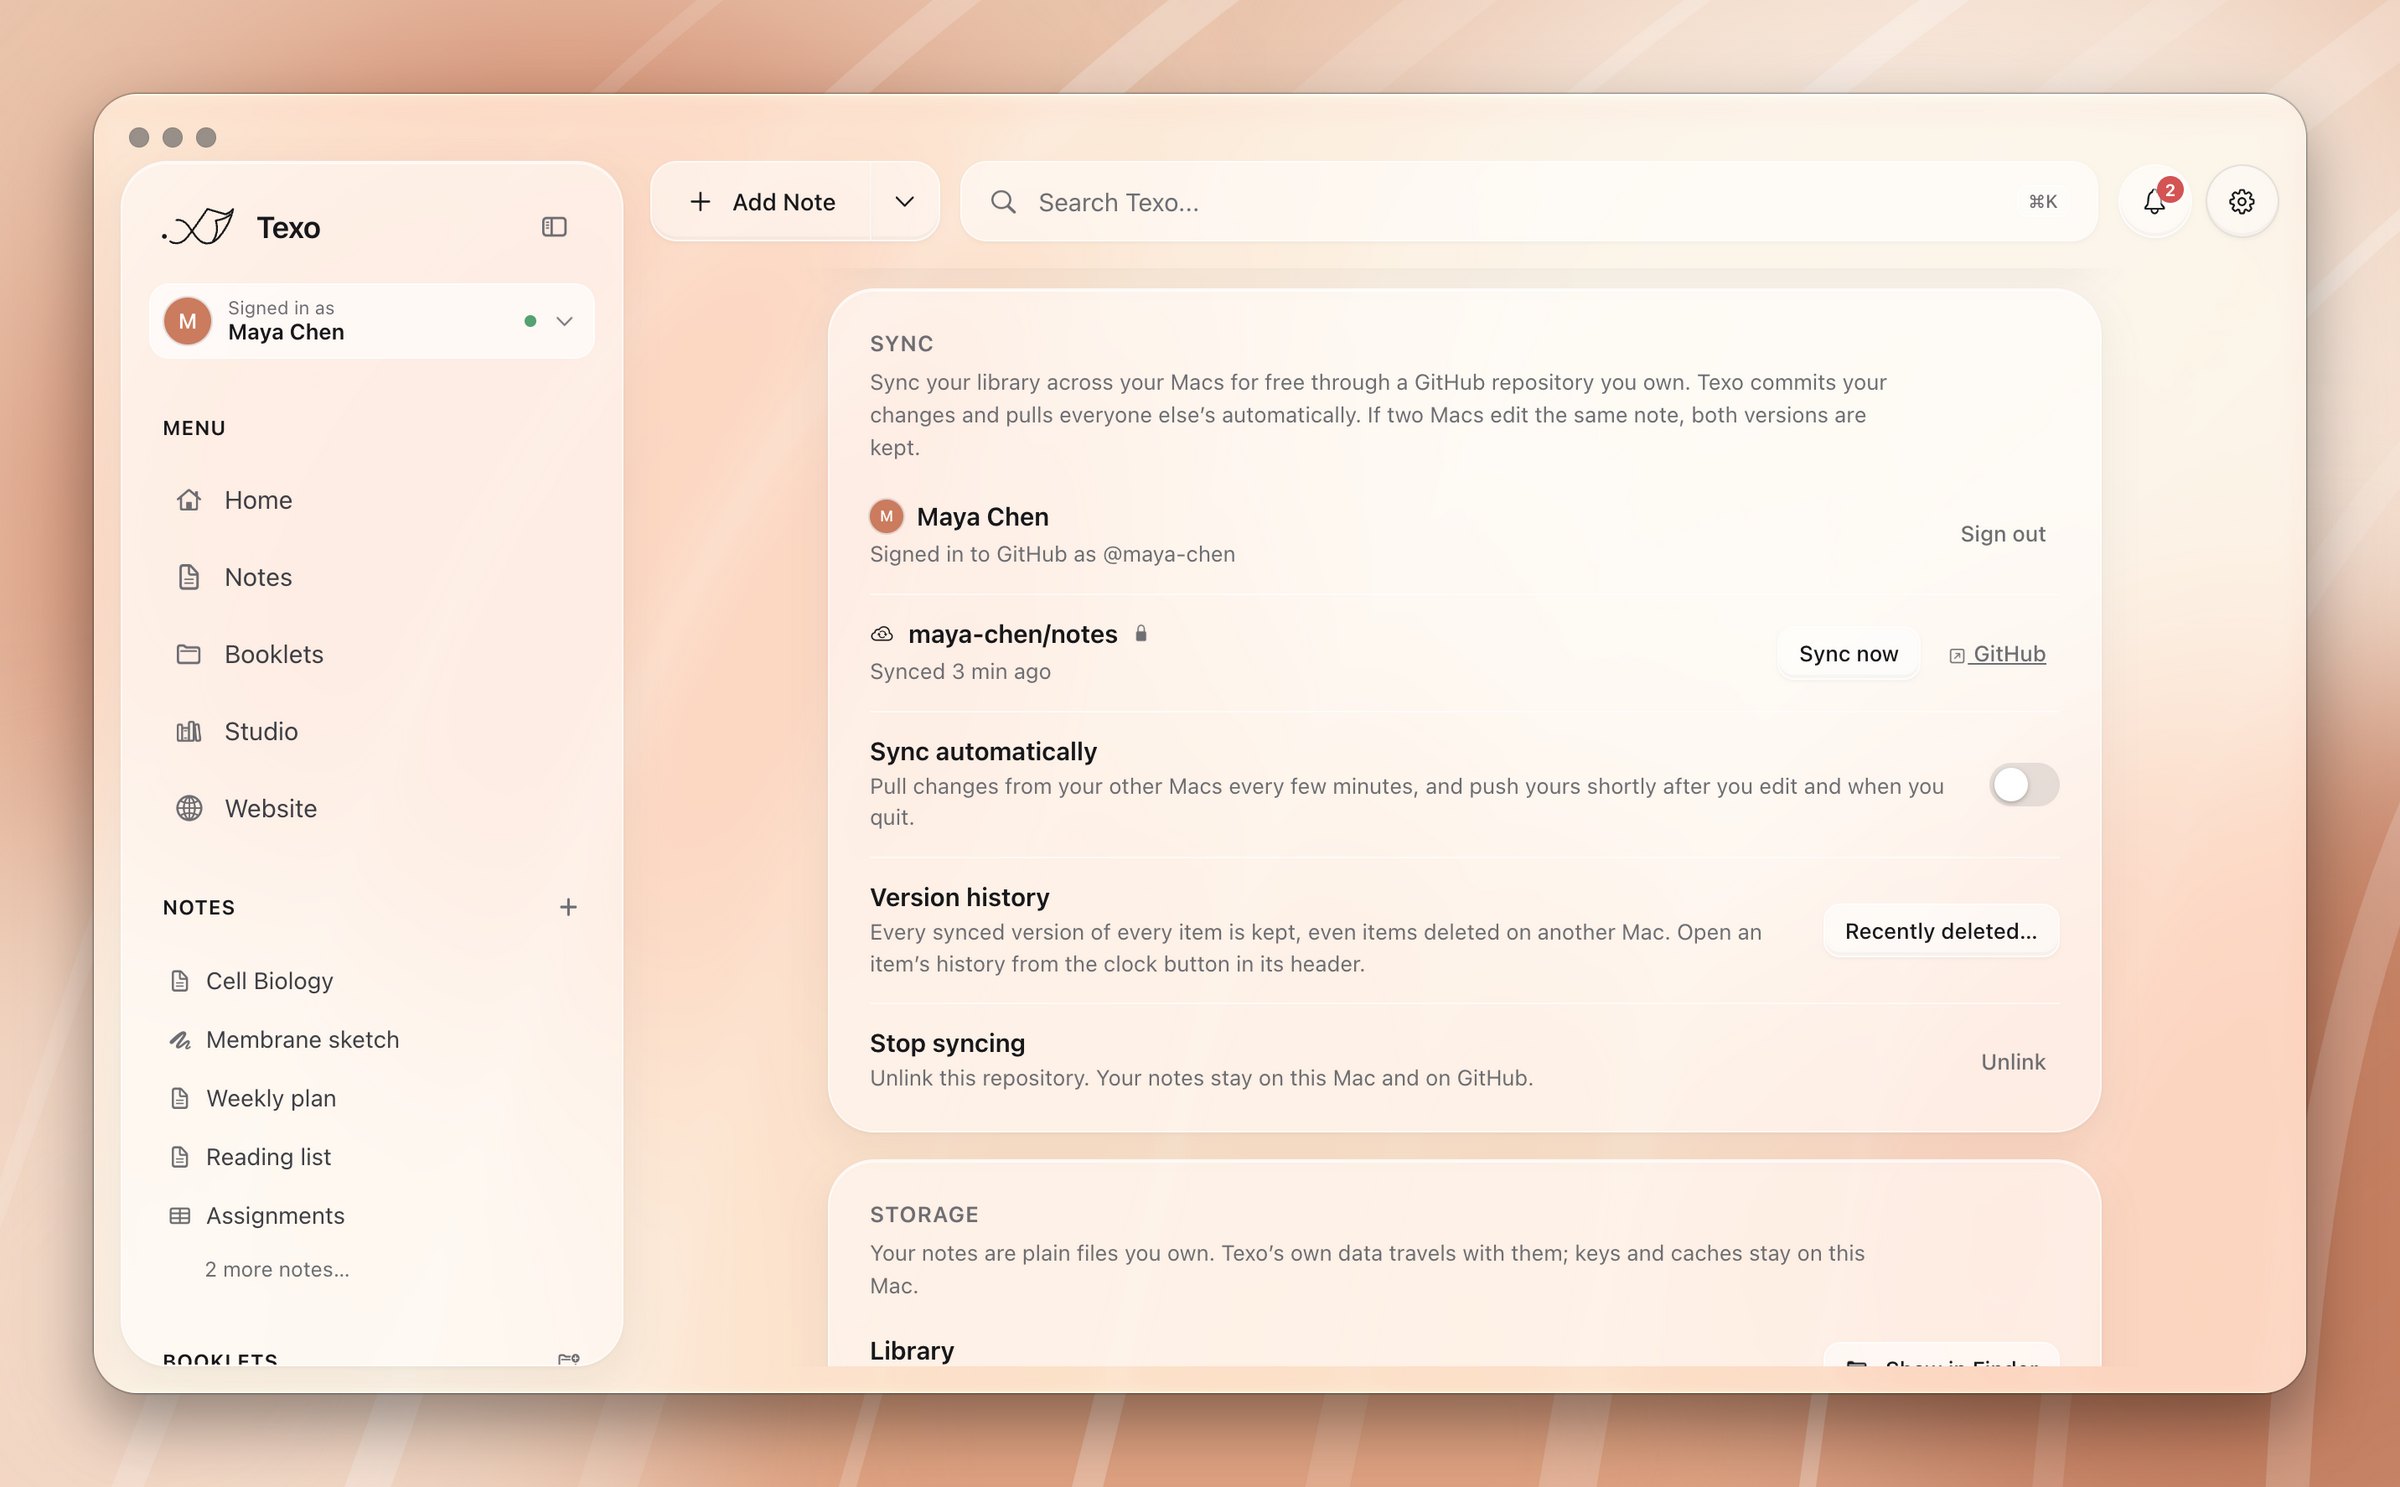
Texo commits and pulls at launch, about 20 seconds after you edit, every 5 minutes, when your Mac wakes, and before quitting.
Conflicts
- Same note edited on two Macs: this Mac's version stays. The other one is saved beside it as "Note (conflicted copy 2026-11-16 09.30)", and you get a notification.
- Edited on one Mac, deleted on the other: the edit wins.
- Files over 95 MB stay on the Mac they were made on. GitHub refuses files over 100 MB.
How to
- Install Git if you don't have it: run
xcode-select --installin Terminal. - Open Settings → Sync and click Sign in with GitHub, or paste a personal access token.
- Create a new repository, or pick an existing one. Picking an existing one is how a second Mac joins.
- The Signed in as bar under the logo shows the sync status. Its menu opens the repository, syncs now, and opens Recently deleted.
Version history
With sync on, every synced version of every item is kept. Each version is labelled: edited, synced from another Mac, restored, accepted a suggestion, or the name of whoever changed it.
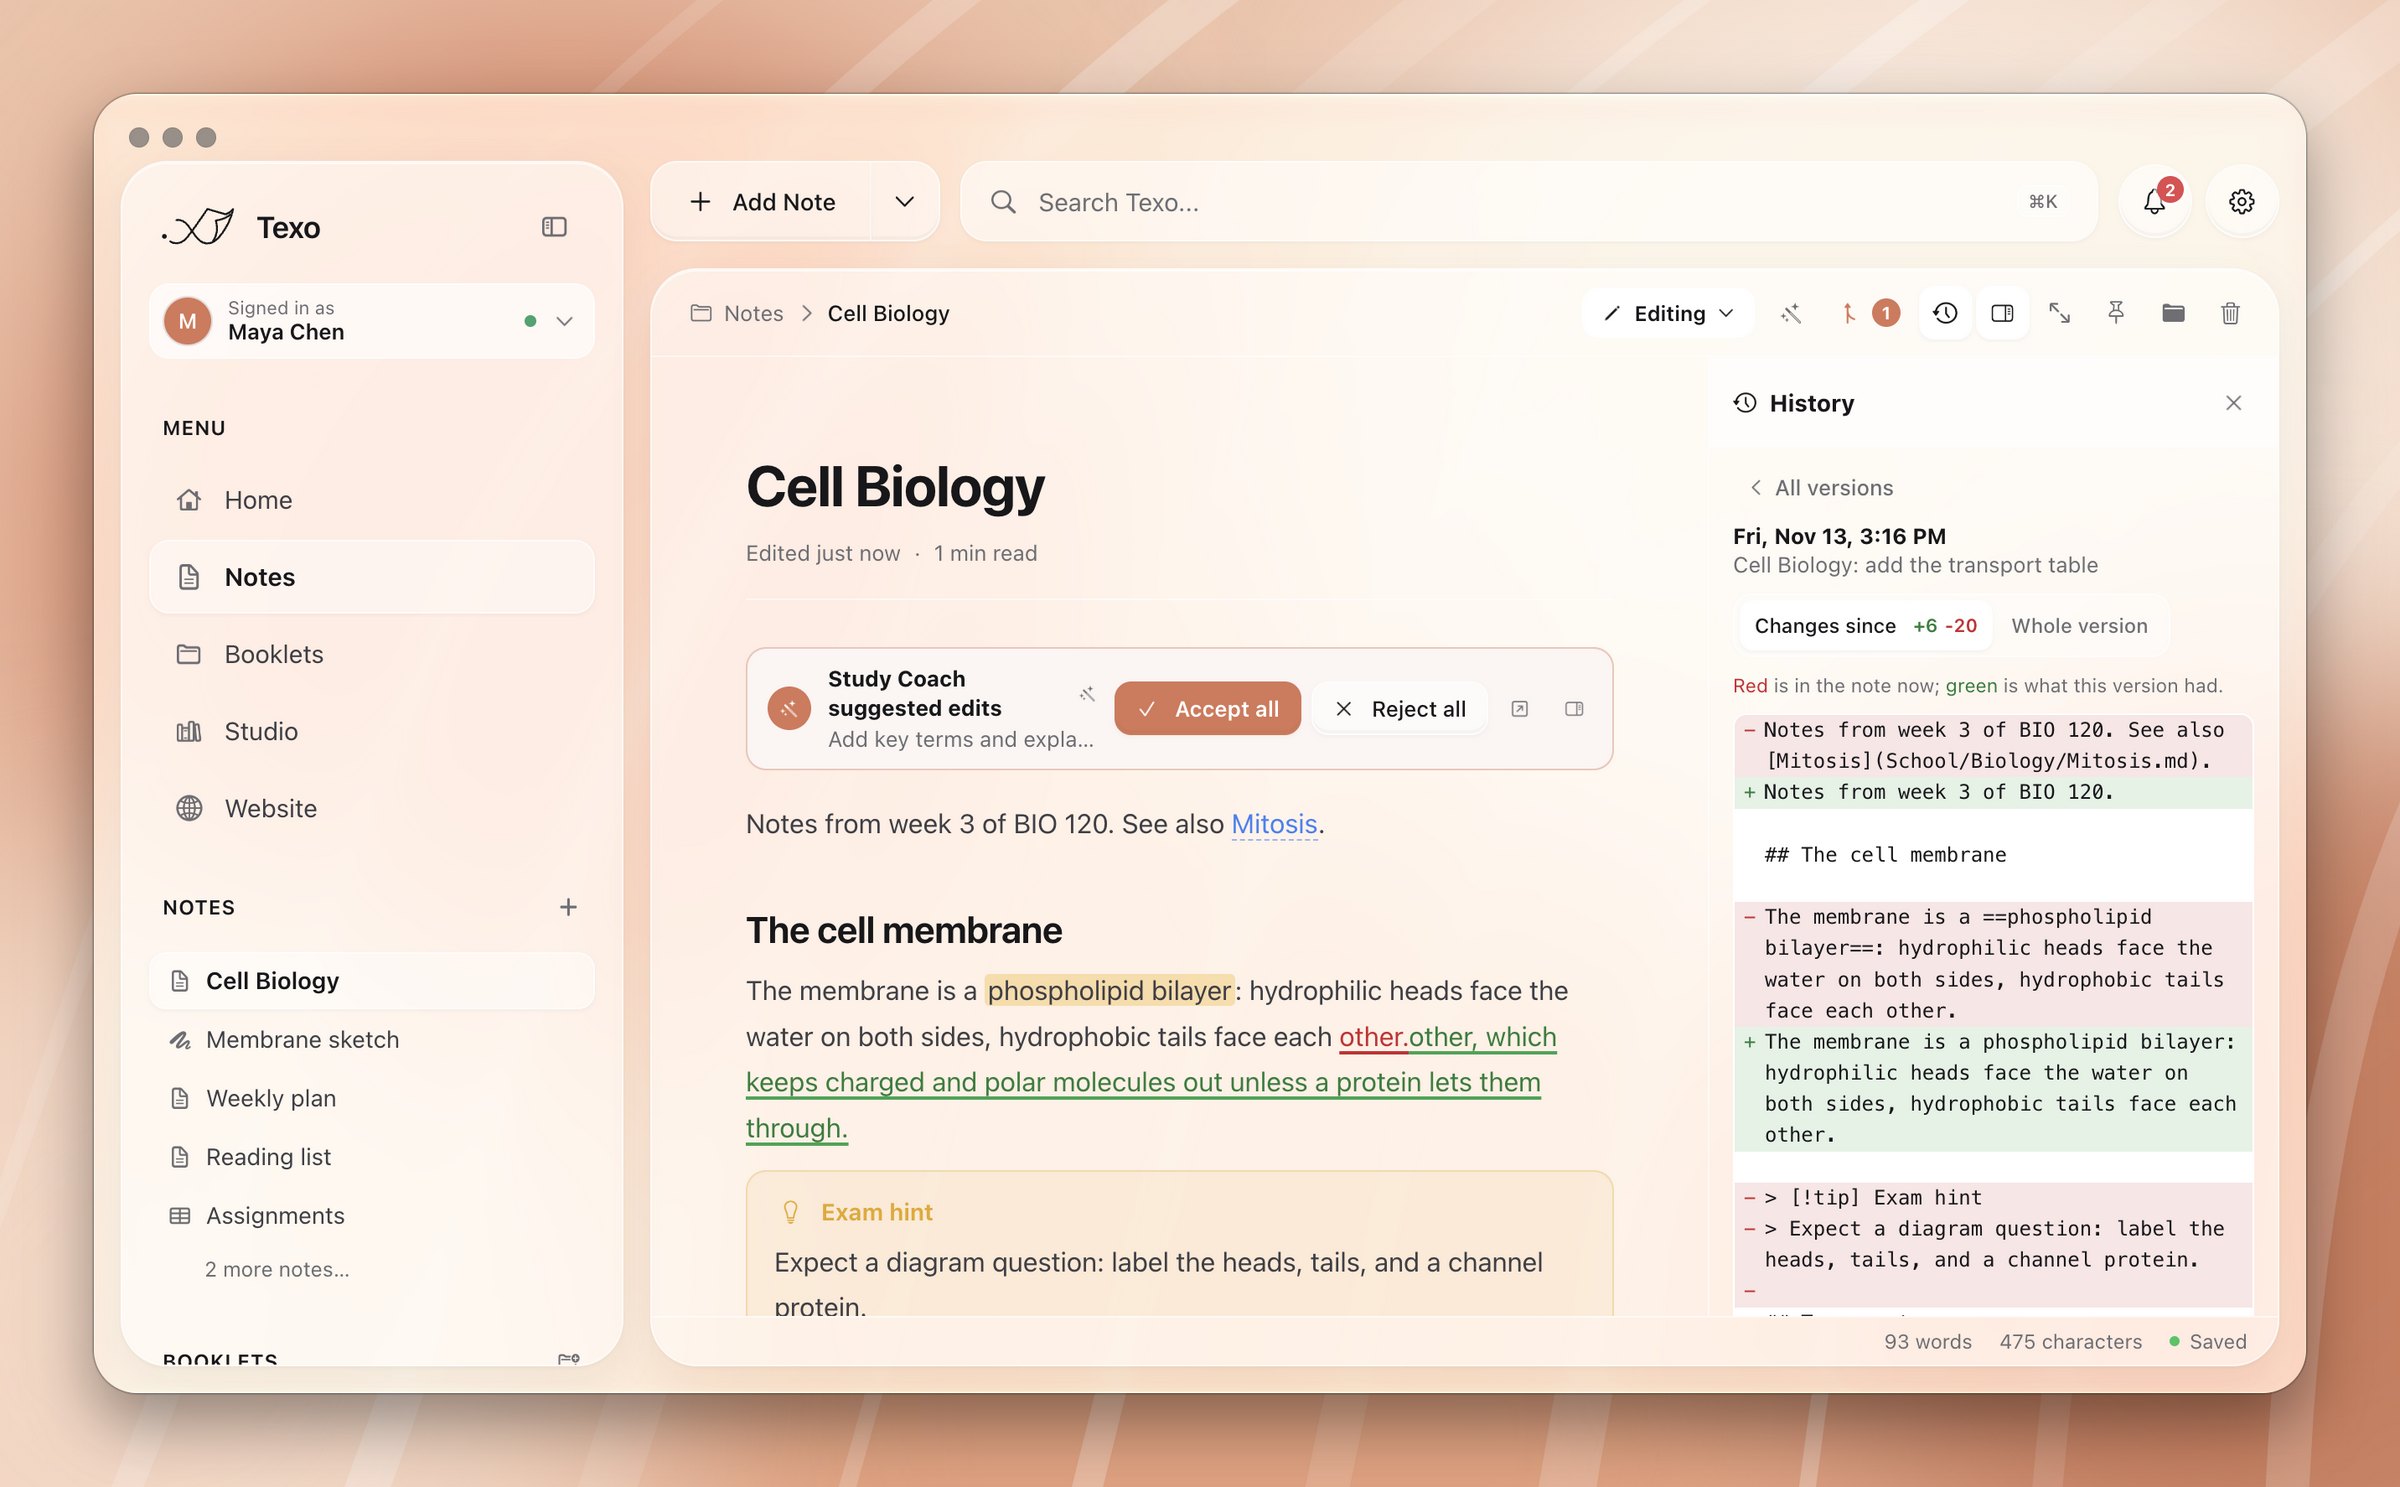
Restoring never overwrites history. The old version comes back as a new version, so a restore can be undone too.
How to
- Open an item and click the clock button in its header.
- Pick a version. Changes since shows what's different in red and green. Whole version shows the full text as it was.
- Click Restore this version.
- To get back a deleted item, open Settings → Sync → Recently deleted…. It lists items deleted on any of your Macs, with a preview.
Edit, Suggest and View
Every item has a mode switch in its header. The mode is remembered per item, per Mac.
- Editing: changes go straight into the item.
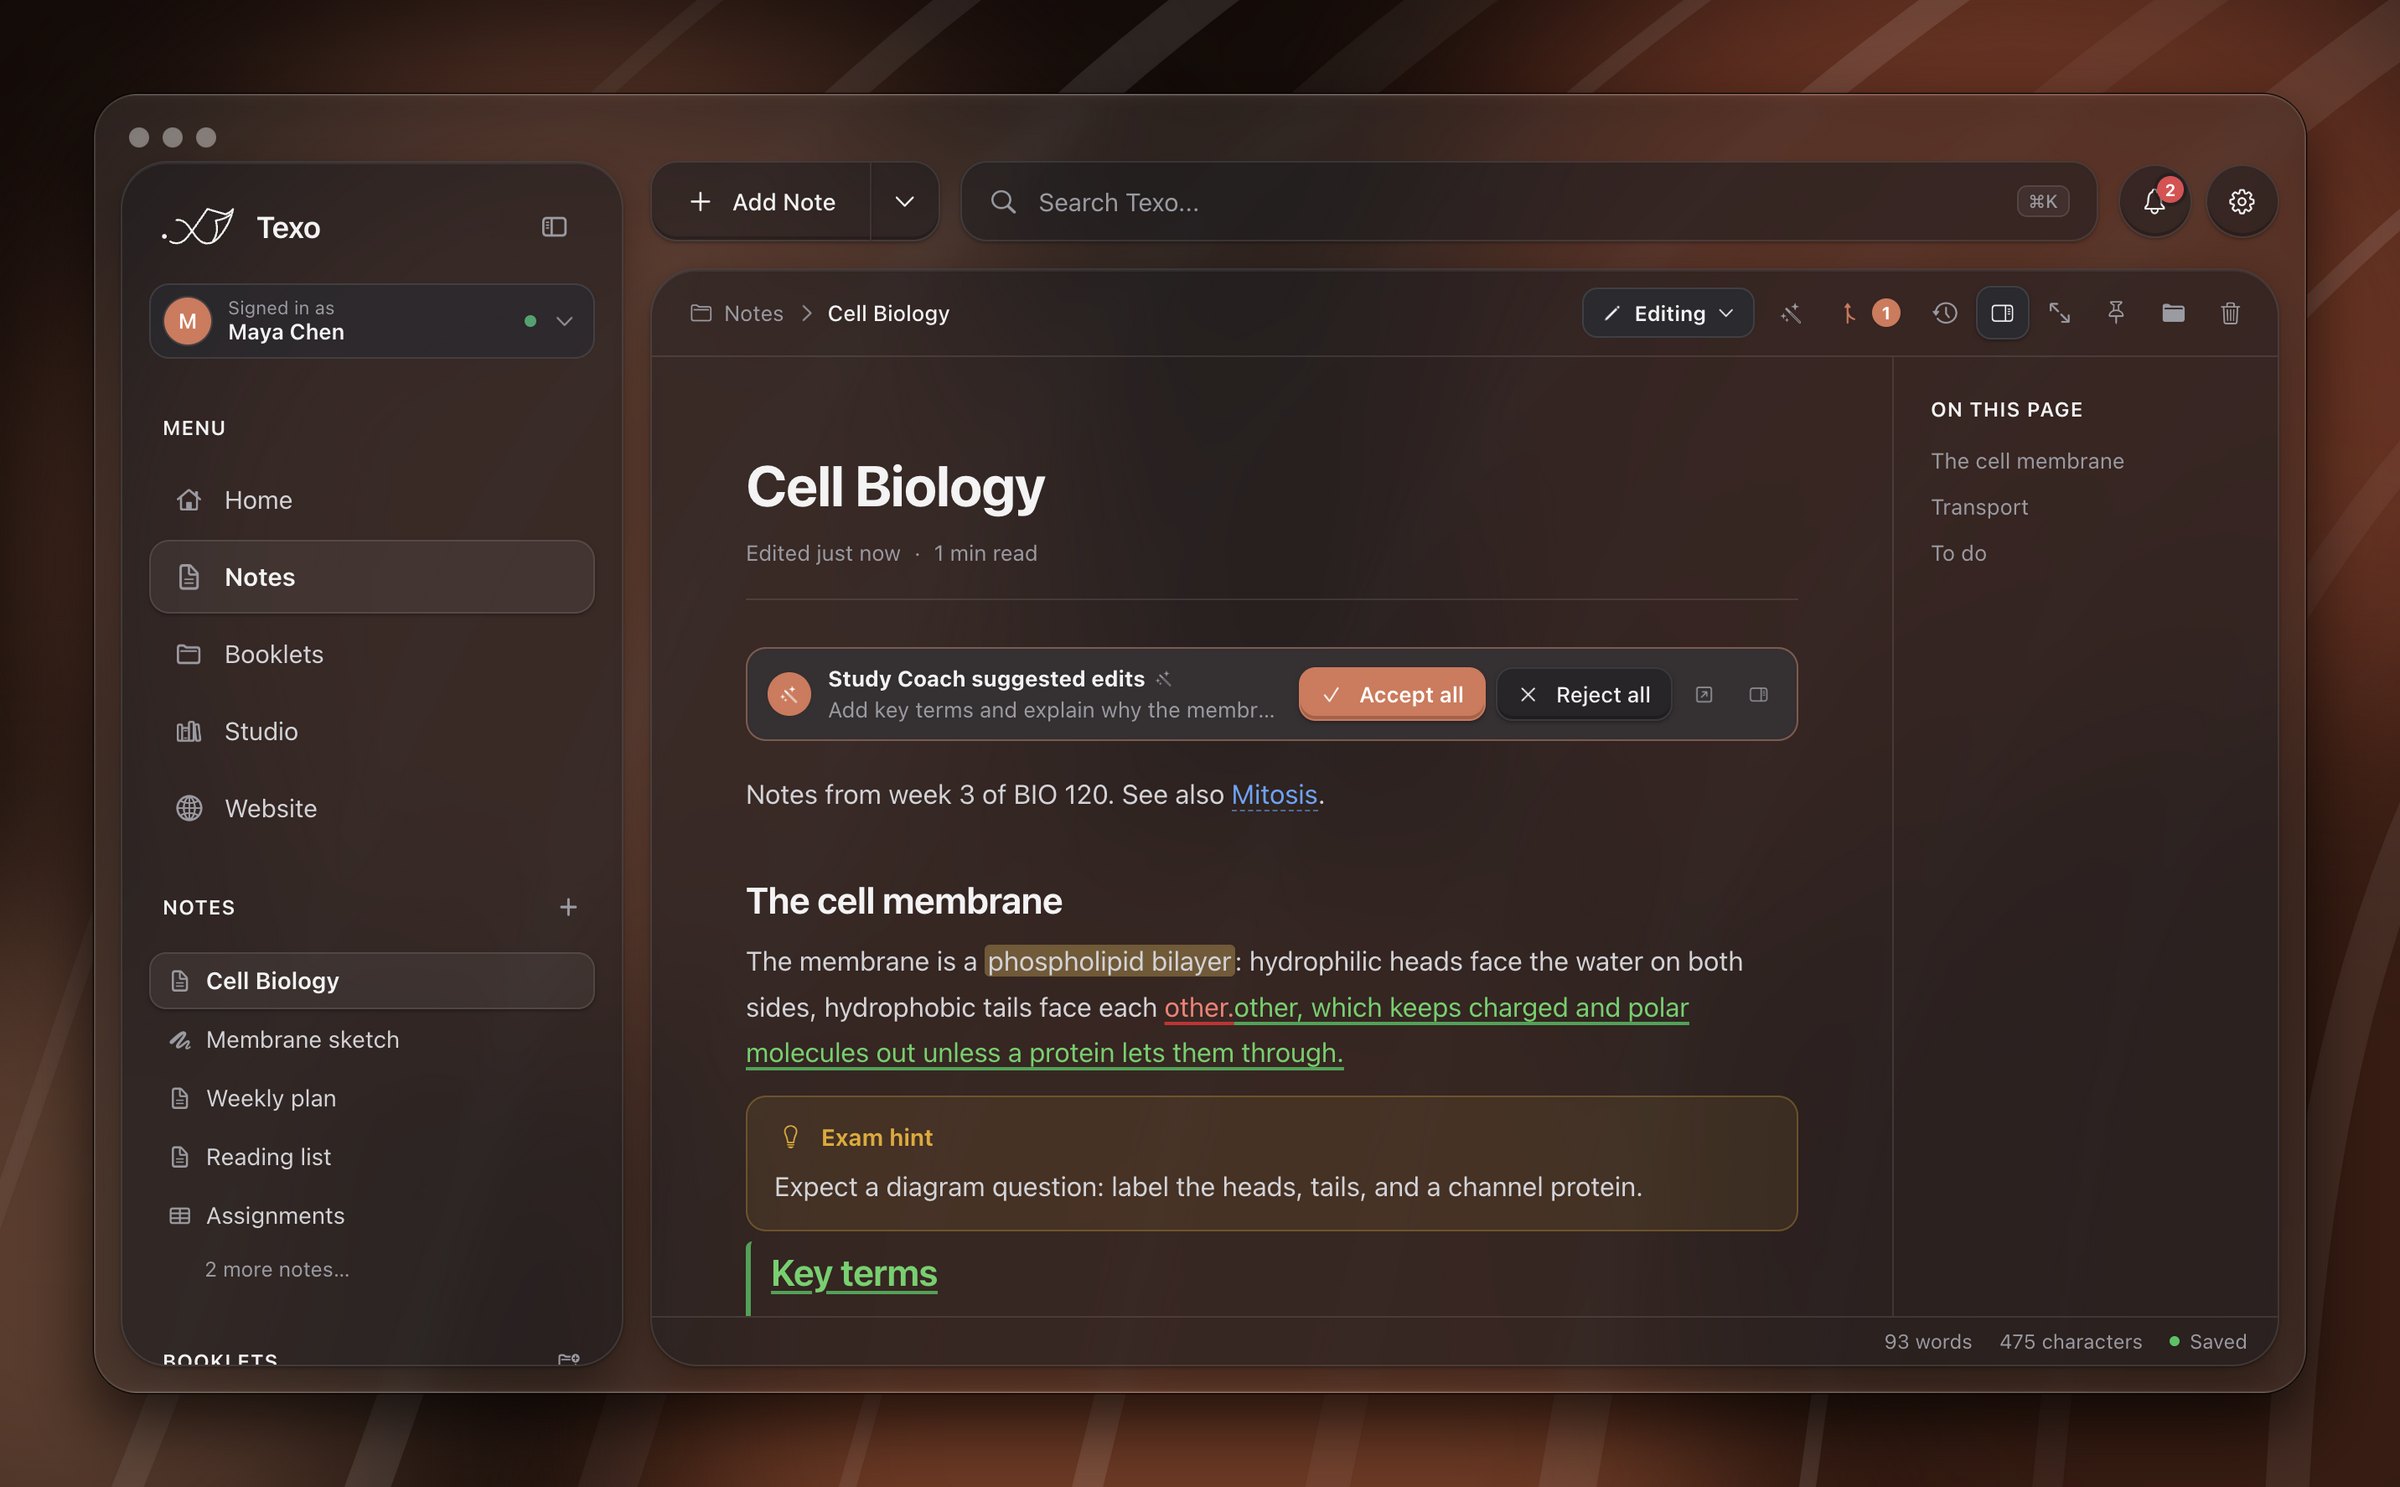
- Suggesting: changes are saved on the item's own suggestion branch. The item itself is untouched. In a note, added text is underlined in green and removed text stays visible, underlined in red.
- Viewing: read-only. You can still scroll, select, copy, pan and zoom.
How to
- Click the mode button in the item's header (it reads Editing by default) and choose a mode.
- In Suggesting, hover a change to undo it, or use Discard all.
- Your suggestion syncs to your other Macs, where it can be accepted or rejected in Editing mode.
Suggestions
Changes proposed by someone else, reviewed right on the page. They come from four places: pull requests on your repository, branches pushed by collaborators, agent proposals, and your own Suggesting mode.
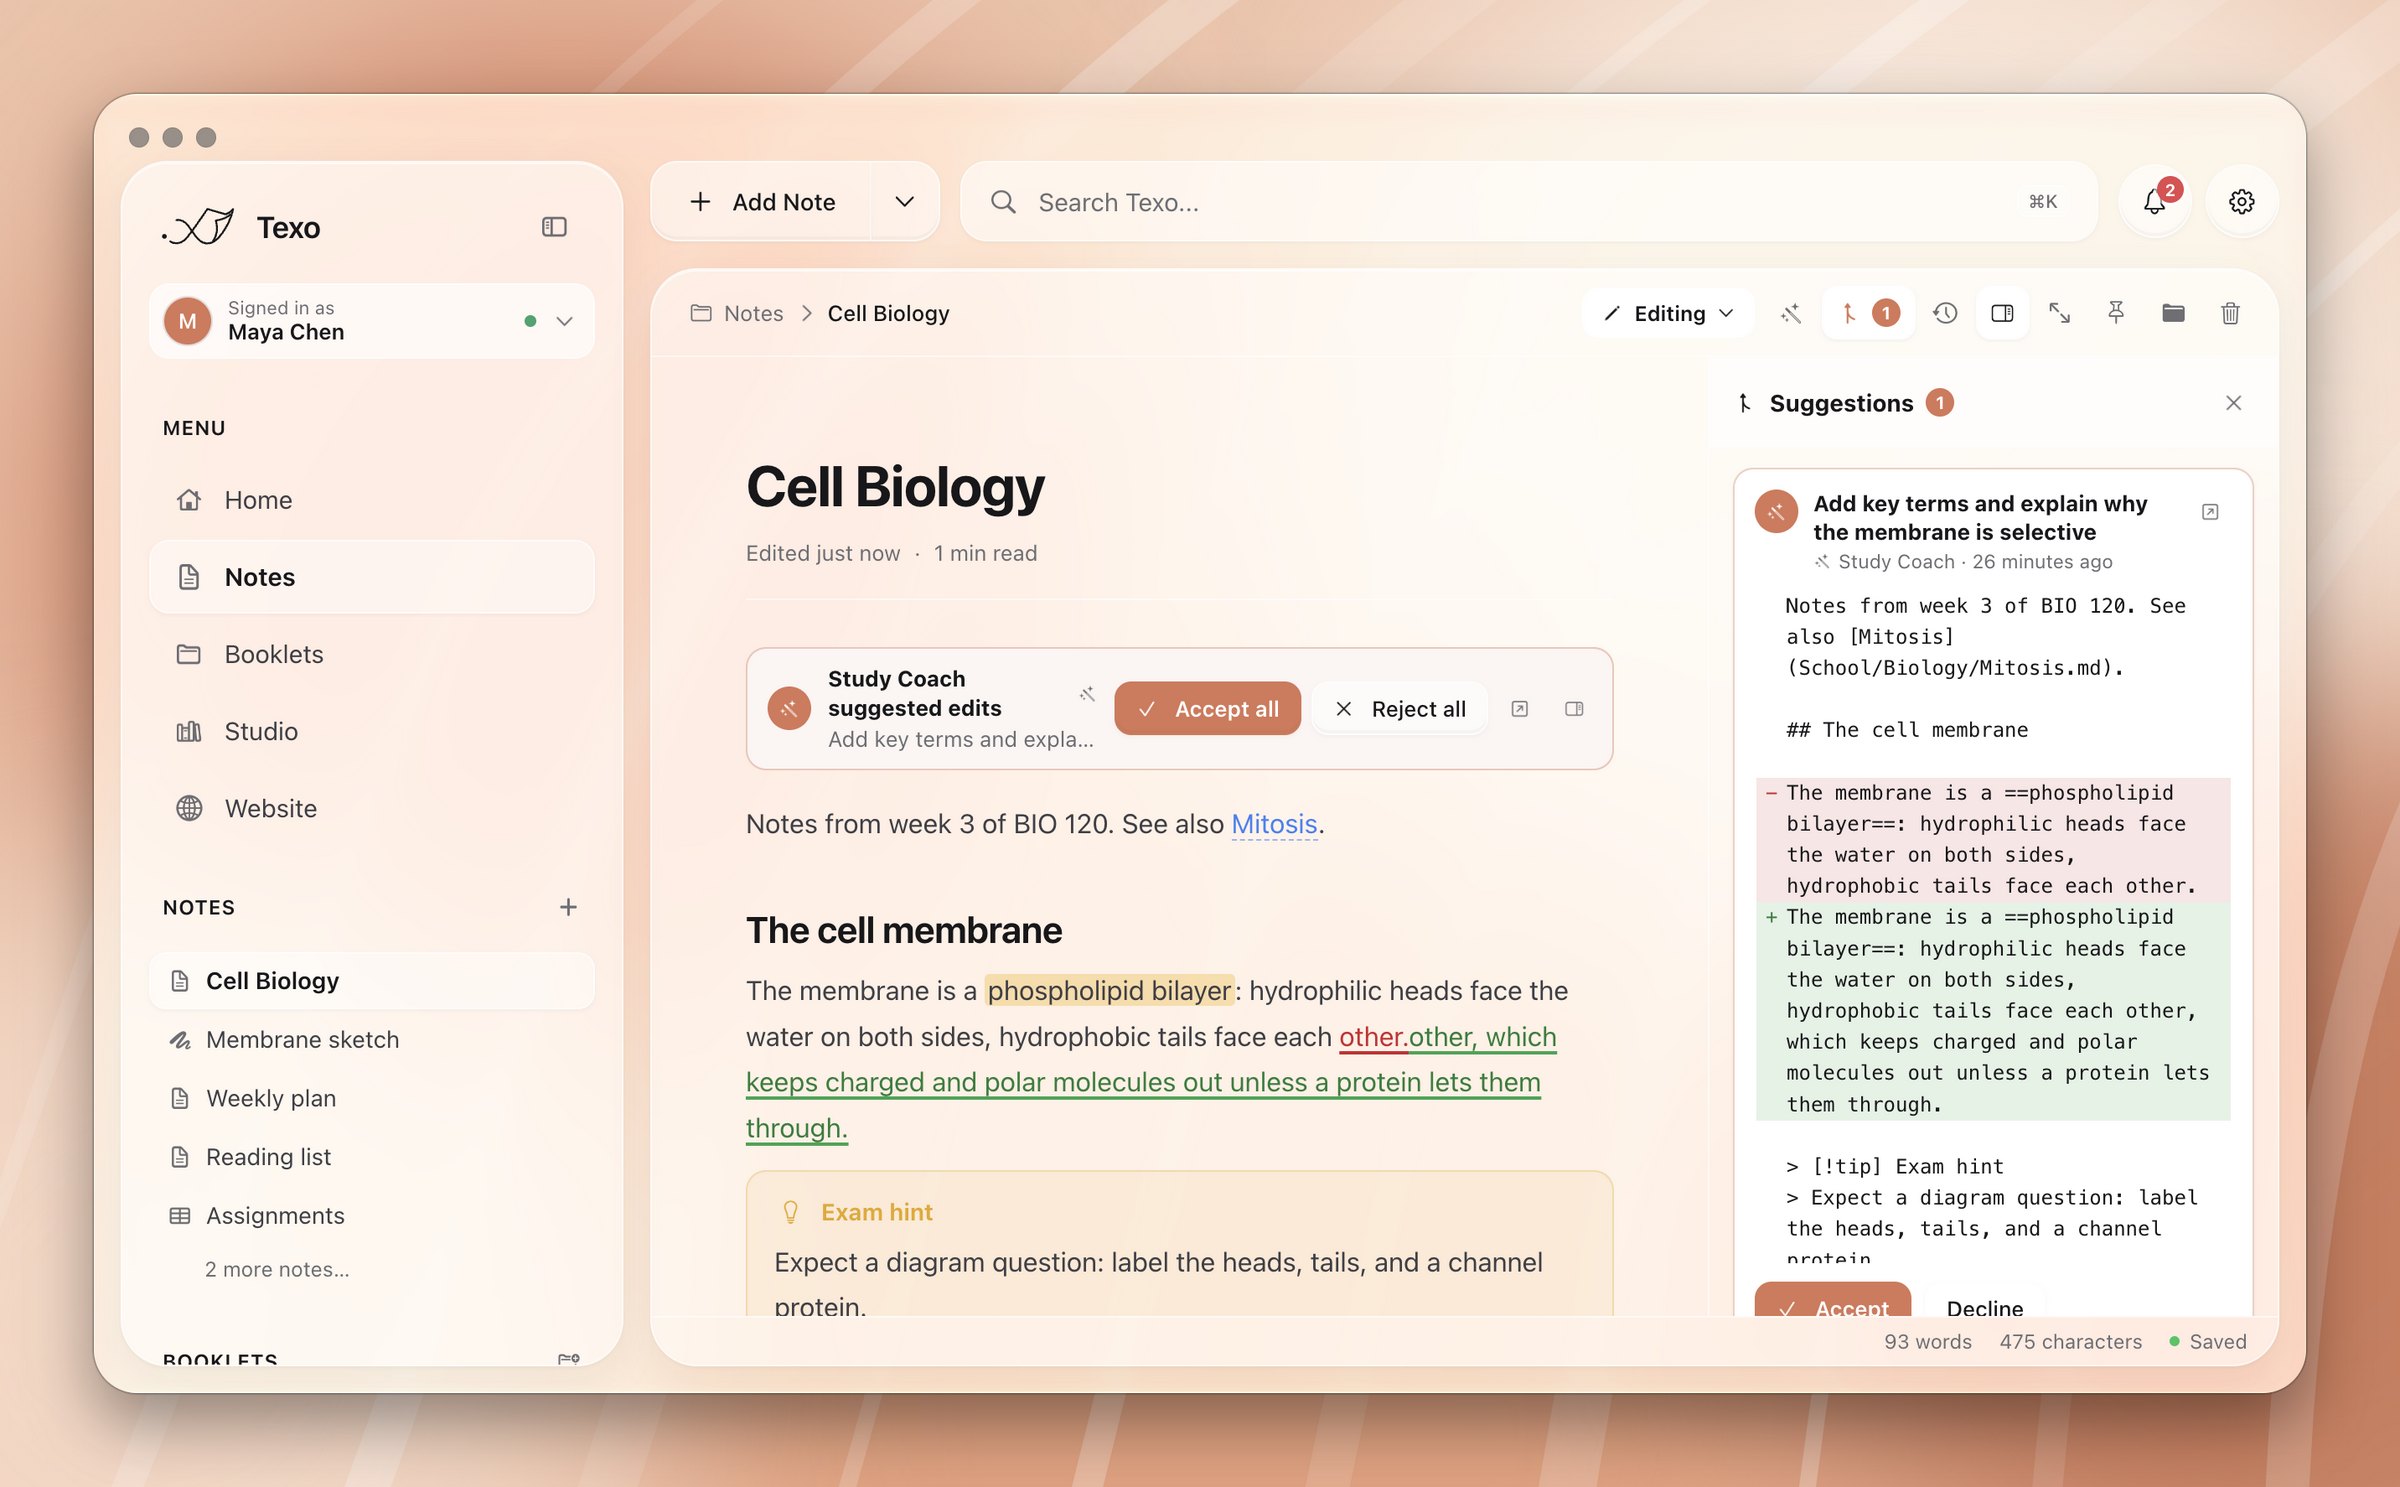
Accepting keeps your own edits. Texo merges the suggestion with what's on your page now, line by line, and only asks when you both changed the same lines.
When every change is decided, a pull request is closed with a thank-you comment and an agent's branch is deleted.
How to
- A bar above the note says who suggested what. The bell shows new suggestions too.
- Hover a change to accept or reject just that one.
- Or use Accept all or Reject all. With several suggestions, ‹ › flips between them.
- For databases, drawings and other items, open the suggestions panel from the header to see a line-by-line diff.
Websites
One booklet becomes a website on GitHub Pages. Each note is a page. A note called index, Home or README is the front page, and sub-booklets become sections of the menu.
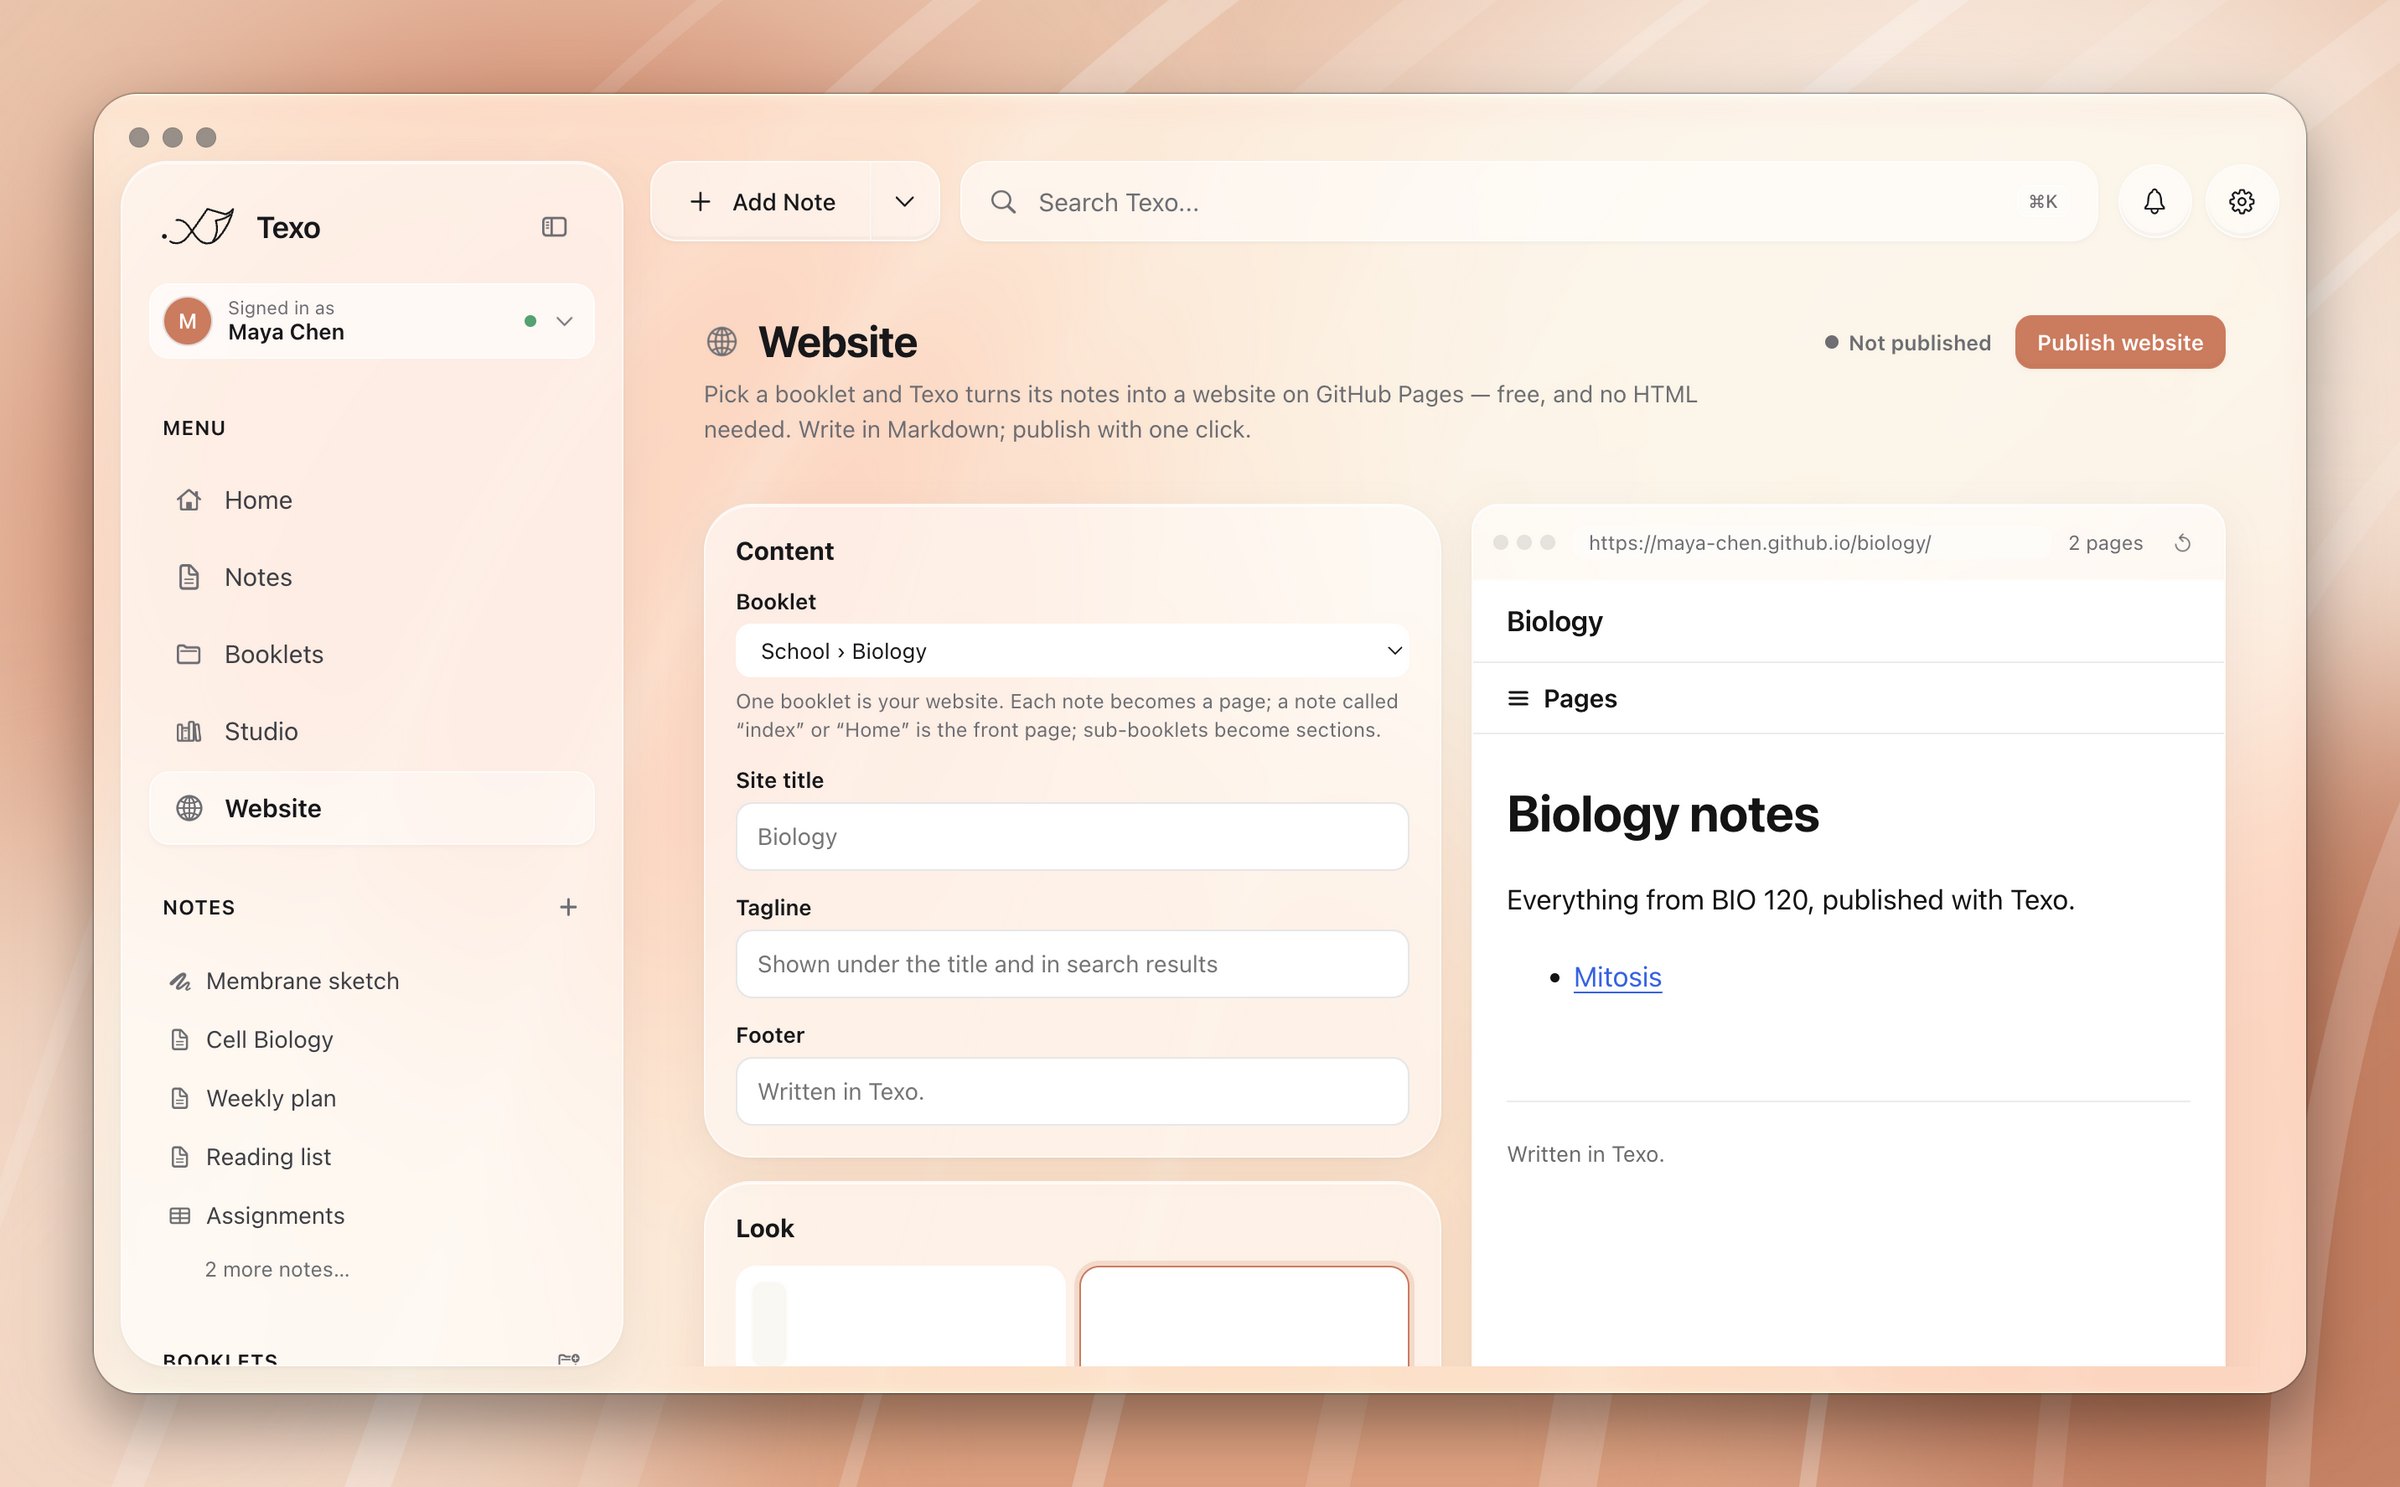
Headings, lists, tables, callouts, highlights, math, images and links between notes all render. Databases become tables.
The site is published from its own public repository, so the rest of your library stays private.
Page settings
A short header at the top of a note controls its page:
---
title: About me
description: Shown in search results
order: 1        # position in the menu
draft: true     # leave it off the site
hidden: true    # on the site, not in the menu
---
How to
- Open Website in the sidebar and choose a booklet.
- Set a title, tagline and footer. Pick a theme: Paper, Minimal, Docs or Midnight, or No theme with your own CSS.
- Watch the live preview, then click Publish website.
- The address is
you.github.io/site-name. For a custom domain, Texo shows the exact DNS records to add. HTTPS turns on by itself. - Republish with one click, or let it republish after each sync that changed the booklet. Unpublish takes the site down.
Notifications
The bell next to Settings collects sync conflicts and failures, new suggestions, website builds, and finished agent tasks and automations. Click one to go straight to it. When Texo isn't in front, the important ones also show as macOS notifications.
Agent tasks that take longer than 20 seconds notify you when they finish.
Appearance
On macOS 26 and later, the window sits on real liquid glass. The slider runs from solid panels to fully clear.
How to
- Open Settings → Appearance.
- Choose System, Light or Dark.
- Drag Liquid glass between Solid and Clear.
- Pick a Tint colour and set its strength, or leave it clear.
- Turn on Bold sidebar icons or give the icons a colour. Reduced motion is here too.
- Settings → Editor sets the font (sans, serif or mono), text size and page width.
Shortcuts
| ⌘N | New note in the current booklet |
| ⌘K | Find a note |
| ⌘J | Summon an agent in a note |
| ⌘\ | Show or hide the sidebar |
| ⇧⌘F | Focus mode |
| / | Insert a block, template or agent |
| : then Tab | Insert an emoji by shortcode |
| ⌘⌥[ / ⌘⌥] | Fold or unfold the section under a heading |
Privacy and security
There is no Texo server. Your notes stay on your Mac unless you turn on sync. Then they go to your own repository and nowhere else.
- Keys: AI provider keys and your GitHub token are encrypted with the macOS Keychain, stored outside your library, and never exposed to the app's pages. Git receives the token through its environment, so it never appears in a command line or in
.git/config. - Your email: commits use GitHub's private no-reply address.
- GitHub access: signing in asks for GitHub's
repopermission, which covers every repository you can push to. For narrower access, sign in with a fine-grained personal access token limited to your notes repository. - Agents: they ask before moving anything to the Trash, overwriting a whole item, restoring an old version or running a shell command. Switch off any ability an agent doesn't need.
- Fully local: run agents on Ollama and nothing leaves your Mac.
About
Texo exists because the useful parts of note apps keep moving behind subscriptions. Sync across devices, version history and AI help are often locked to a monthly plan. Students, who use these tools every day, are the people least able to pay for all of them.
Texo includes all of it, free. There are no tiers, no trial and no account with us.
What it costs to run
- The app: nothing.
- Sync and history: nothing. They use a repository in your own GitHub account.
- Websites: nothing. GitHub Pages hosts them.
- Agents: whatever your AI provider charges for the tokens used, usually a few cents a task. Every task shows its cost. With Ollama on your Mac, it's free.
Open source
The full source is on GitHub under the MIT license. You can read it, run it, change it and share your changes. If Texo ever stopped being maintained, your notes would still be plain files, and the code would still be there for anyone to pick up.
Contributing
Anyone can contribute. Bug reports, feature ideas, documentation fixes and code are all welcome, and you don't need to ask before starting.
Report a bug or suggest a feature
How to
- Open the issues page and check whether it's already there.
- Open a new issue. For a bug, include your macOS version, what you did, what you expected and what happened instead. A screenshot helps.
Run Texo from source
You need macOS and Node.js 20 or later. Git is needed for sync, and Python 3 with ipykernel for notebooks.
git clone https://github.com/sjapanwala/texo
cd texo
npm install        # also rebuilds the terminal module for Electron
npm run dev # opens the app with hot reload| Command | What it does |
|---|---|
npm run dev | Runs the app with hot reload |
npm run typecheck | Checks the TypeScript |
npm run build | Typechecks and bundles the app into dist/ |
npm run dist | Builds a macOS .dmg |
npm run screenshots | Retakes the screenshots from a demo library. Your own notes are never touched. |
Where things live
src/: the interface, in React and TypeScript.electron/: everything that touches your Mac: files, sync, history, suggestions, websites and agents.scripts/: build, packaging and screenshot tools.docs/: this website.
Send a change
How to
- Fork the repository on GitHub and create a branch for your change.
- Make the change. Keep it focused on one thing.
- Run
npm run typecheckand try it innpm run dev. - Open a pull request against
main. Say what changed and why. For anything visual, add a screenshot.